Showing posts with label Butterick. Show all posts

Wednesday, April 21, 2010

Sew...Another Halter?

Craftstylish Triangle Halter
Thanks to everyone for sending me birthday wishes!  I had a pretty great weekend with my shopping finds on Friday, a great meal out that night, a terrific play Saturday night, and then a surprise birthday party Sunday evening!  Yes, my hubby threw me a surprise party complete with candles, cake, and friends!  Of course there were also plenty of gag gifts including a cane accessorized with a horn, hair dye, and Geritol tablets!  Luckily,  there wasn't a "Lordy, Lordy Look Who's 40" sign anywhere in sight!  I probably would have drawn the line with that.  Anyway, I've accepted that I'm the one who is 40.  It's better than the alternative right?  Think about it.

Sew, what's next?  I've actually started making some graduation presents, but I realized that I can't blog about them since the graduates may be looking.  While I work on those projects in secret, I decided to try making another halter top.  Instead of another one of the Butterick patterns, I am going to try a pattern I found online at Craftstylish. Check out the Super Easy Triangle Halter. "Super easy" hmm?    All I need is 1 yard of fabric, which is cut into a triangle, 1/4 yard of knit fabric for binding, and 1 1/2 yards of ribbon.  The directions seem easy enough.  Of course they all seem easy at first right?  Sew, we'll see.  I'll keep you posted!

Angela


Wednesday, April 14, 2010

Lost in Translation (& Cyberspace!)

Back story:
I nearly experienced a Level 12 Meltdown last night as Blogger completely deleted my Pattern Translation Post just as I was about to publish it to my Blog!  I have no idea what happened, but I soon discovered that even though this has happened to a lot of bloggers' posts, I could find no one with an answer about how to "fix it."  Anyway, I've written it again.  Read this translation and if you try this project, please let me know.  I'd also love to see some pics!
I've completed the Butterick 4685 Fast & Easy (she said facetiously) top. I posted some photos on a separate page of the blue top. If you've followed me on my journey to completion, you'll know that, out of necessity, I made some changes to my top. In order to try to write a better review, or translation, I felt I needed to do the project again, following the pattern more closely. So, I made another shirt. I feel like I had a pretty good handle on the instructions, especially since I had already completed the blue top. Side note: I am secretly sick of this top and everything about the pattern. But, I promised a translation, sew here goes:

Pattern: Butterick Fast and Easy B4685 (view B)
Size: 14 (c'mon I have broad shoulders)
Materials I used: 1 7/8 yds. pink cotton, 1 1/4 yds 1/4" elastic, *61 1/2 inches 1 1/2" single edge scalloped lace trim*
Changes I made: For the ruffled sleeve bands, I made two self faced ruffles from two 28 1/2" X 4 1/2" pieces of the shirt fabric.  I also shortened the lengths of the sleeves
Recommend for beginner?  Yes, it is a good starter shirt, but make sure you have enough materials!
NOTE:  The pattern notes to buy 1 3/8 yds of the lace trim.  THIS WILL NOT BE ENOUGH.  The neckline (includes the tops of the sleeves/shoulders) on both my tops was about 60 inches around.  Obviously this is before the elastic is inserted.  For the second shirt, I bought 3 yds of lace in case I decided to use this on the ends of the sleeves instead of the fabric ruffles.

Step 1:  Cut out pattern pieces from the tissue paper pattern.  I used pieces 1, 2, 3.  I didn't use 4 because I made the self faced ruffles.  More on that later.
Step 2:  Lay out the pattern pieces on the fabric  (make it easier and use 45" wide fabric).  Sometimes this is confusing, but remember, the straight of grain (indicated by the arrow) should be parallel to the selvages and or fold.  Transfer the markings (the big circles) from the pattern to the fabric.   
Step 3:  Cut out the fabric pieces.  Oh, and NEVER cut the fold. You will be placing #1 and #2 on the fold.
Step 4:  Stitch the front (1) to the back (2).  Start stitching (right sides together) just below the armholes.  Stop stitching when you get to the large circles at the bottom. 
Step 5:  Stitch sleeve seams.  Fold in half (lengthwise) each sleeve right sides together.  Stitch the seam below the "armpit."  Leave the upper part open as this will be sewn to the body piece.
Step 6:  Make the ruffle.  I determined that since each sleeve was 14" around the bottom, I would need 2 28" lengths of fabric.  I actually made them 28 1/2" to be safe.  In order for the ruffles to be 2" wide.  I cut each 4 1/2".  The self faced ruffles are nicer (even though you use more fabric) because they are finished on both edges and "underneath."  They just make the shirt much "cleaner" on the inside. 
Step 7:  On the inside, or wrong side, of the shirt, attach each ruffle to each sleeve end by basting around.  I then stitched bias tape around the inside to cover the seams.  See photo:

single fold bias tape stitched inside sleeve band
Step 8:  On the right side of the shirt, pin the lace to the upper edge.  Make sure the straight edge of the lace is even with the upper edge of the shirt.  Turn under the end of the lace in order to sew it to the other end of the lace.  Stitch along this vertical seam.  Baste around close to the upper edge. 
Step 9:  Instead of now turning the upper edge to the inside in order to make the casing for the elastic, I stitched the bias tape along the top edge and lower edge (on the wrong side of the shirt).  I made sure to leave an opening in the end for the elastic.  NOTE:  This is similar to how I finished the sleeves, but on the neck, I didn't fold the bias tape.  I kept it "open" and used the "channel" down the middle to encase the elastic.
Step 10:  Insert one end of the elastic after attaching a safety pin to it.  Scrunch it around and pin the elastic to the other end.  Try on the shirt and make sure the lace lays how you like it.  Adjust if necessary.  Remove the pin and stitch together.
Step 11:  Hem the bottom of the shirt.  The pattern advises to use a Narrow Hem.   Basically I did a double fold hem.

That's it.  Why not give this a try?

Saturday, April 10, 2010

Almost Finished!

Wow...super busy day today!  I didn't get much time to work on my Butterick top, but did sneak away long enough to finish the neck.  Sorry about the picture quality, but hey, it's almost 11:30 pm.  I'm hoping to finish the bottom hem and clean up some of the seams tomorrow.  Oh, and write my "review."  Until then, goodnight.
Angela

Friday, April 9, 2010

Ye of Little Faith...


I want to give a big shout out to Deb, my sewing guru. I took my top into her today and she confirmed that I HAD DONE NOTHING WRONG! That's right...even lacking the math gene, I did not mess up the measurements for the top or the lace! Deb said that 1 3/8 yards of lace trim is definitely not enough to go around the top of the top. In other words, Butterick messed up when writing the pattern! I feel vindicated. Now, I just need to finish the top. I had made a long ruffle out of the top fabric and sewed that around the top. This ruffle matches the ruffle I made to go around the bottoms of both sleeves. I need to clean up my edges and then finish the top by adding the elastic. Deb shared a cool trick for making the casing for the elastic at the same time making a clean edge...use bias tape! This is such a great idea. I can't wait to finish this top!
I do feel obligated to complete the top as indicated in the pattern, however. I mean if I am going to write a "review" for the pattern, I better actually make the top shown. With this in mind, I purchased more fabric today as well as more (a lot more) lace trim. Once I complete the original top, I will try the pattern again with this new fabric. Sew, stay tuned.
Check out the purse I completed last night. I changed up the Simplicity pattern a little for my bag. The pattern "called for" prequilted fabric, however I used some great home dec fabric. I also made the handles longer. What do you think?


Wednesday, April 7, 2010

Measure Twice, Cut Once..or twice or more...

Have I mentioned that in capacity of superhero, I haven't exactly had to use math frequently to fight the bad guys and stand up for justice? Okay, I am mentioning this now because I am pretty sure I probably messed up on my Butterick top due to my lack of the math gene.  I haven't totally figured out where I went wrong (besides cutting the front half in half), but I came up short when I pinned the lace around the top edge.  The pattern advised I would need 1 3/8 yards of single edged lace trim.  I relied on the cutting lady at Joann's to supply me this amount.  I trust that she measured correctly.  I just cannot sort out where I went wrong to have this trim not fit all the way around the top.  If anyone has any ideas of what happened, please let me know.  I am going to try to contact someone at Butterick...is there a helpline there or "phone a friend?"  If I cannot reach anyone telephonically, I will have to take my pattern pieces, etc. to Joann's and request help from my sewing instructor.  Embarrassing!
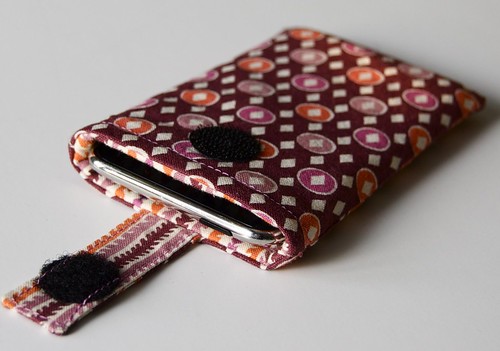
If this debacle didn't quash my dream of quitting my day job for a new sewing career, my next project only added to my frustration.  Although I completed the iTouch case using the tutorial from  A Dog Named Banjo, it turned out too small for my iTouch.  I'm not sure why as I used the measurements indicated in the tutorial.  The upside is that my old iPod fits in my new case!  Have a look at the pictures.
New Case

iTouch Case iPod
Maybe I should re-read Sewing for Dummies??  Well, at least I can check this off my to-do list right?
Angela

Monday, April 5, 2010

Cutting on the Fold

I hope everyone had a fantastic Easter!  I enjoyed a three day weekend with family and friends from out of town.  I also began working on the Butterick top.  I picked up my supplies Friday and on Saturday began cutting out my pattern pieces.  Herein the problems started.  First, I bought fabric 60" inches wide.  I didn't realize this might be an issue until I tried to follow the layout diagram in order to cut my fabric pieces.  I really don't think the width of the fabric had to do with what happened next, but I'd rather lay the blame there than on sewer error.  The truth is...well, when it says in the directions to "NEVER cut on this line" they mean it.  The specifics on what happened and how I fixed (she said loosely) it will all be revealed when I post the actual pattern review, which, by the way, will most likely be more of a pattern translation than a proper review.  I am hoping to complete this project tomorrow evening.  When and if this actually happens, I will post a picture.  In the meantime, I have added a "to-do" list on my blog.  Have a look at my list and if you have any suggestions for ideas, patterns, specific fabrics, etc, please give me a shout! 

Thursday, April 1, 2010

iTouch Cover added to the "To Do List"

First, let me again say thanks to all who followed the links from Totally Tutorials and Craft Gossip to Sew Loquacious to check out my adjustable fabric slide tutorial!  Also, thanks for the emails and great feedback!  It really means a lot to me to get everyone's input!  I am so (SEW) excited to do another tutorial!
Speaking of tutes, I found a one for making an iTouch (or iPhone) cover at Dog Named Banjo that I am going to try.  Last weekend, after filling my 2 GB iPod to capacity, I got a brand new 32 GB iPod Touch.  It is so cool...it has WiFi!  I guess I figured now that I have joined the 21st Century (according to my daughter), I decided I needed this cool gadget.  I love it.  I don't love the case I bought for it, however.  Hence, I began searching for patterns in order to make my own.  I really like the fabric Robyn used for her iTouch, too.  Check out her web page for the tutorial at:  http://www.dognamedbanjo.com/2010/01/13/tutorial-ipod-touch-cover/
Here is a photo from her site:

My to do list now includes getting the rest of my supplies I need to start on the Butterick top, starting on this top, and making this cover for my iTouch.  BTW, I cut out the pattern pieces for the top earlier this evening and began reading the pattern.  At first glance, it appears "doable" and fairly tres facile, but we'll see...
Until next, let's be careful with those sewing machines!

Friday, March 26, 2010

Butterick Pattern Review

I hope everyone likes the new blog format and background.  I'm pretty pleased with the look and I love the vintage photo I found!  I have also added an "email me" button.  I must say I am pretty pleased with myself for figuring that one out!  I guess you could say I am becoming a real Blogger eh?  Please, please send comments or email me and give me some feedback!  I'm really not an expert and actually need all the help/input I can get!  Thanks!

Pattern Review:

I've decided that when I sew a project using a pattern, I will write/post a review on that pattern.  When I started sewing a few years ago, I found most patterns difficult to follow and understand.  Even the patterns described as "Very Easy" were definitely not tres facile for me!  To me, it seems, that most patterns are written for folks that know all the sewing verbiage, etc. and not for crafters like me.  So, I'd like to review the patterns I use and maybe "translate" them into directions that might be better understood.  Sidenote:  In my experience, Sewing For Dummies patterns are still difficult to follow.  Does that make me a dummy?  I don't think so.  I just think that they aren't written well.

 I will review the pattern I will use for my next sewing project, which will be the next halter in the stack of halter patterns I bought a few weeks ago.  I started with Butterick 4800, 6 Sew Easy.  I began with this pattern believing it would be the easiest.  The next top I'm going to sew (try) is Butterick 4685 Fast & Easy.  I'm going to need some notions for this top, including 1 1/4 yards of 1/4" elastic and 1 3/8 yards of 1 1/2" single-edged scalloped lace trim.  I will also need to decide what sort of fabric to use.  My options are lightweight broadcloth, lightweight linen or cotton knits.  I will need 1 7/8 yards of whatever fabric I choose.  Sew, what's next?  A trip to the fabric store!
Angela 

Tuesday, March 16, 2010

Halter Weather!


It is sunny and nearly 50 degrees in the Midwest! Well, partly sunny...or partly cloudy? Anyway, I hear birds chirping and see a tinge of green in the grass...and that's not the St. Patrick's Day Eve green beer talking. It may be partly sunny and 50 (probably more like 42), but when folks are donning capris and sandals to run to Walmart, that means Spring is just round the corner and that screams summer halter weather is not far behind! In celebration, I took advantage of the recent Butterick pattern sale at JoAnn's and picked up three halter patterns. To be honest, I haven't worn a halter since I was probably 13. That was a long, long time ago. I've decided, however, I've earned the right to wear whatever I want now. I do need to work on my tan though. I mean the wings are one thing, but to be so white I could glow in the dark, well, that's really not a 'good thing.'


I think I will start with the 6 Sew Easy pattern. It seems the simplest. I am a novice here, so there may be some cursing involved. I'll keep you posted.
Happy St. Patrick's Day!
Angela