Showing posts with label image transfer. Show all posts

Wednesday, May 23, 2012

Experimenting: Homemade Bubble Jet Set Recipe


Newsflash:  I'm not a scientist!  I flunked chemistry and never even considered taking physics at school.  However, I'm cheap.  I mean, I don't like to spend a lot of money if I can avoid it.  Considering Bubble Jet Set costs anywhere from $15 to $22 a bottle, I decided to try to make my own.   I do not want the disaster that occurred after I washed my Bunny Quilt to happen again!


I searched the internet for a homemade Bubble Jet Set recipe.  Here is the most simple version I could find:


2 tablespoons of Alum (the stuff used when canning pickles)
2 1/2 teaspoons washing soda (not baking soda) (I found this in the grocery store)
1/2 teaspoon liquid fabric softner
1 cup of hot water

Mix the first 3 ingredients and then add the hot water.  Stir.  It will be foamy.


When the foam eases, soak your fabric for 15 minutes.  Wring out and dry completely.  I poured the leftover mix into a baby food jar to save for future use.


When my fabric was dry (I cheated and put it in the dryer), I ironed freezer paper to it and ran it through my printer.  I used the same bunny image I used for my quilt.

Image pre-wash

Image post-wash

Yay!  It worked!  Before I use a printed image on a quilt or table topper again, however, I think I will do more testing, ahem, experimenting.  It faded a bit, but nothing like before!  For the most part:  SUCCESS!

One more thing:  School's out!  That means sewing summer clothes for my littlest daughter!  Yep, every summer, I try to make a few dresses and skirts for her.  Here is Charlotte's first skirt for Summer 2012:

Butterick 4722 View E
  
I used a Hawaiian looking blue batik.  


I know, last year I said I would NOT sew ruffles again, but I couldn't resist.  I thought this skirt was just too cute!

Tootles!
Blog Signature Pin It

Friday, May 11, 2012

Another Lesson Learned


Today is my mom's birthday.   With her birthday so close to Mother's Day, it makes this time of year especially difficult.  She died seven years ago.  I miss her so much everyday.  She was my best friend.  I am lucky, though, that I have some special ladies in my life that I consider like mothers to me.  I made the red Friendship Star/Disappearing Nine Patch table topper for one of those ladies.  I made another quilted topper for another.  I used the fat quarters I won from Annie's Ruby Slipperz.


My Aunt Pat loves bunnies and her home is decorated with very light pastels and romantic flowers.  These fabrics were perfect!  The topper I made measures 18" X 18" (finished).

Post Washed

The bunny image had printed so beautifully onto my fabric, but when I washed it, it almost disappeared completely! I could have cried.  I scrambled researching how I could fix it.  In the end, however, I decided the faded image just made the piece look more authentically vintage.

Pre-Washed
Pinwheels were a first here and I think they turned out pretty nice.  I also think the fabric is fabulous...love it!


I've learned a lot during my brief quilting journey.  The lesson here:  Make your fabric color fast BEFORE printing on it!  This only applies if you are printing directly onto regular fabric using freezer paper and you are going to wash your quilt.  (You might not feel it necessary to wash a wall hanging; like my Octopus Wall Hanging).  I believe if you use products designed for transferring images, that fabric is already treated.  I've done computer research and I have discovered that if you use something called Bubble Jet Set, you can use your own fabric and the freezer paper method.  I'm off to find that product and will give it a try!

Happy Mother's Day to all you moms out there and all those "like" moms, too!  And Happy Birthday Mom.  

Tootles!
Blog Signature Pin It

Thursday, April 12, 2012

Winging It


The lilacs in my yard have finished blooming.  The clematis, however, is going mad!  I will post a photo as soon as I can pull my winter clothes back out of my closet!  I've said it before, but I still can't get over that it can be 90 degrees here one day and the next it is barely 50!  Seriously, our air conditioning was running on April 1st!  Today, I'm tempted to flip the heat back on!  The only way to keep warm is to keep moving!  I've spent the day cleaning and vacuuming my house.  It truly needed it!  I also started quilting my batik quilt.  I had put it off because I was nervous about doing such a large quilt myself.  I decided, however, just to start and not worry about getting it perfect.  After much thought (too much), I committed to straight line quilting.  I  didn't measure or draw lines, however.  I just followed the horizontal and vertical seem lines.  I just winged it!  That's a new quilting term!  I will show you as soon as I'm finished.  In the meantime, have a look at my Octopus Wall Hanging:


It's kind of plain, but, according to my daughter, "simple" is better.  I quilted this one using straight lines, too. I followed the seem lines around the inside and outside borders and then along the horizontal and vertical lines around the squares.  I'm pleased with the piece overall, but especially happy with how the octopus image transferred.  I got the octopus image from The Graphics Fairy.  Instead of transferring it onto the fabric using gel medium, I printed it directly onto off-white fabric using freezer paper.  


It came out so great!  It was so easy, too!  I'm definitely going to be using this method a lot more...especially for my bags!

Gotta run!  Tootles!

Blog Signature Pin It

Wednesday, November 30, 2011

Handmade Gift Exchange


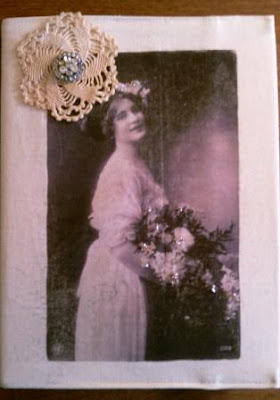
In my last post, I told you a little about the Craftaholics Handmade Gift Exchange.  Today, I am super excited because I get to show you the gifts I made for my partner, Meaghan!  But first, let me say, "thanks" to Linda of Craftaholics Anonymous for hosting this exchange.  Through her, and the gift exchange, I "met" Meaghan!  We've been corresponding for the past several weeks and I feel I've made a true friend!  The photo at the top of this post is of the journal cover I made for Meaghan.  I used TAP (Transfer Artist Paper) to transfer the vintage lady image.  I embellished the image with small beads.  I tea dyed the doily and attached it using a vintage button.  By the way, I sewed the journal cover to fit a standard sized composition notebook.  If interested, leave a comment or send me an email and I will detail the specific dimensions and sewing directions.


Besides the journal cover I sewed.  I tried my hand at a little jewelry making.  You might remember I tried making a dictionary necklace charm a few weeks ago using Dimensional Magic Mod Podge.  That project didn't exactly turn out, but for Meaghan's charm, I used better quality paper and a different kind of bezel.  I also added a few bits of bling!  This time, success!


Again, I'm so happy I participated in this gift exchange.  It's been wonderful getting to know Meaghan, who lives in one of my most favorite places, North Carolina!  I'm so pleased that she likes the gifts I made for her and I am excited to see what she has made for me!  My package is on its way to my neck of the woods.  I will post about it when it arrives.  In the meantime,  please jump over to Craftaholics Anonymous and have a look at all the fabulous handmade gifts made and exchanged all over the country!

Tootles!  
Blog Signature

Tuesday, November 22, 2011

Transfer Artist Paper (TAP) Project


Where to begin?  I've gone nearly another week between posts!  I'm afraid I've been a slacker blogger of late.  I'm sorry.  I promise to get my blogging act together!  So what have I been doing this past week?  Well, besides the torture, I mean, physical therapy, I organized a birthday party for my now seven year old daughter!  The party was a success...even the cheetah print cakes!  I also got a bit of sewing done.   I  completed a couple of projects for my Craftaholics Anonymous Handmade Gift Exchange partner.  Unfortunately, I can't show you what I made for her just yet, but I can show you a few other sewing gifts I've made this past week.  Be sure to check out all the handmade gifts exchanged at Craftaholics Anonymous in the coming weeks!  My partner should be receiving her gifts soon!  I hope she loves them!  I can't wait to see what she has made for me, too!

A Fairy Journal Cover

Spaceship Ear Bud Case

Spaceship Ear Bud Case (back view)

I made the Fairy Journal cover for my friend, Molly.  (I hope she isn't reading this post!)  I used TAP (Transfer Artist Paper) to transfer the fairy image.  I must say, I was pretty impressed with TAP.  The image transferred to the canvas fabric perfectly!  I embellished the image using beads and embroidery.  I made the ear bud case for her little boy, Tucker.  I found the pattern and tutorial for the case at Dog Under My Desk blog via Craft Gossip.  I think it turned out cute and it was really easy, and quick, to sew.  These are great for using up fabric scraps and would make great stocking stuffers, too!

For all you readers in the United States, have a terrific Thanksgiving.  Enjoy your day of turkey, sweet potatoes, cranberry sauce, and of course pumpkin pie!  I made a "practice" pie a few days ago...

Yummy!

I also made a fantastic meal of chicken and dumplings this week.  The recipe would also be great for your leftover turkey.  


I leave you with my mom's recipe for awesome dumplings:

4 eggs
1/2 cup milk
pinch salt
flour until stiff
Drop in boiling soup and cook for about 15 minutes

Happy Thanksgiving!
Blog Signature

Thursday, November 10, 2011

Ups and Downs

Geisha Girl Cosmetic Bag (Flat Bottomed)
Surfer Girls Cosmetic Bag (Flat Bottomed)
Wow!  It's been awhile!  I've been MIA for over a week.  I cannot say the reason for my absence is that I've been busy creating, sewing, baking, or doing anything fun.  In fact, the only thing I've been busy doing is physical therapy.  Having this new knee is a lot of work!  "They" said I'd have ups and downs in my recovery.  The last couple of weeks have been full of "downs."  I've been going to torture therapy sessions three times a week, which actually does help, but geesh, I'm ready to be back to normal!

When not at therapy (or napping), I have been working on a few projects, mostly presents for upcoming birthdays and Christmas.  I made the two image transfer cosmetic bags above and added them to my Etsy Shop last week.  I've completed half of a poncho I've been knitting for my daughter.  Her birthday is in a couple of weeks.  I've also done a little more freezer paper stenciling.


This time, I used sparkle acrylic paint mixed with textile medium to create fabric paint.  I've never tried this technique before.  I think it worked pretty well, although the fabric is a little stiffer than had I used regular fabric paint.  This t-shirt is for my step-daughter, Samantha.  She is involved with a dance troupe at her college.  I hope she likes it!


A few nights ago I read a jewelry tutorial at Marla Plain and Small.  Marla's tutorial describes how to make jewelry charms using Dimensional Magic Mod Podge.  I tried the technique using a silver necklace bail and paper I cut from a thesaurus.


The Dimensional Magic is actually some pretty cool stuff.  It really does add dimension and the charm would have been really cool had I not used such a thin piece of paper.  I think the poor quality of paper is the reason why the words on the reverse side can be seen.  I will definitely try this again, but I will use higher quality paper, maybe even laminated?  If any of you have used this product, let me know.  I'd love some pointers!
  
Tootles!
Blog Signature  

Monday, September 19, 2011

For the Love of Fabric & Friends


Have I mentioned how much I love Etsuko Fuyura fabric?  Yes, a million times!  I'll make it one million and one...I love Etsuko Fuyura fabric!  You might remember that I used it to make a a purse for my daughter a few months ago.  This past weekend, a dear friend sent me a little box of goodies, which included an Echino Ni-Co 2011 by Etsuko Furuya Natural fat quarter bundle!  Heaven!  I chose the first FQ to make myself a pair of slippers.  I think they are beyond awesome!


I used Simplicity 2278 for my slippers.  I stayed true to the pattern, however I chose not to use Jiffy Grip for the bottoms.  Instead, I used a suede-like fabric.  My feet will be toasty and look good during my hospital stay next week!  Who said you can't look hip and trendy when you are getting a new knee?  (Would have been funnier if I was getting a new hip instead of a knee!)  Thanks again to my friend for my treasure box.  You know who you are and just how great you are!

I completed a few more bags and added them to my Etsy Shop.  The image transfers turned out great.  The first bag is coin purse size.  Doesn't Nixon look cool?  The other two are flat bottom cosmetic bags.  Who doesn't love bras and shoes?


Thanks for the great feedback about my iPad Curse!  Writing up a tutorial for one is on my list of things to get done before next week.  So, stay tuned!

Tootles for now!
Signature for Blog

Wednesday, September 14, 2011

The "Curse" is a Hit!


Ok, so I finished the "Curse" prototype last weekend.  Basically it is an iPad pocket attached to the inside of a messenger bag.  The first Curse, or prototype (not shown), I made to fit the wearer vertically.  The wearer, my friend and hairdresser, Dana, said the size was perfect and she liked all the pockets, but she felt this vertical style hung a bit too long on her.  So, I tweaked a few of my measurements and turned the bag onto it's side.  Inside the Curse is the iPad pocket, which is secured with a flap and magnetic snap.  Opposite this pocket are two additional large pockets.    


Inside iPad Pocket
2 Pockets Opposite the iPad Pocket

Inside Curse

Here is Dana's feedback email:

     "Okey dokey, the maiden voyage with the curse was a huge success! The weight distributes nicely, the pouch keeps the iPad from moving around and that's great for keeping the bag from swinging around or moving while I'm walking. I was literally able to forget i was even carrying it. I like the space behind the pouch for the cords and the flap that closes the curse keeps anything from falling out so I wouldn't fix what isn't broken and tack or close it. The purse section is perfect. I go to Houston next week so I'm going to use it on the trip. I'll let you know how it travels but I can't imagine that it won't be perfect for what I need. You're a genius!"

Sent from my iPad


Dana said she loves bright colors and it turns out is crazy for polka dots!  What do you think?  I'm pleased with how it turned out...guess I need an iPad now!  If you are interested, let me know.  I will post the dimensions, etc. in case you want to make your own Curse! 

In case you were wondering about the change on my profile picture...that's actually my mom.  I was going through old photos and came across this one.  I think it's an awesome photo.  The 7th anniversary (I hate that word) of her death is in a few days.  I miss her everyday.

Tootles!
Signature for Blog
P.S. I made another Kitten Party zipper bag and added it to my Etsy Shop!  I'm really please with the image transfer on this one!