Showing posts with label sewing tutorials. Show all posts

Wednesday, April 25, 2012

(Friendship) Star Trek


Isn't she gorgeous?  What do you think I should name her?  She is a Trek Pure.  A pure cruising pleasure!  A bit over the top cheesy?  Okay.  Well, this bike was my birthday present from my hubby and I adore her!  I had so much fun biking when we were on vacation that I decided to get a bike of my own!  I've got a rack on the back and I plan on putting a basket on the front.  Remember putting playing cards on the spokes when you were a kid?  I won't go that far, but will accessorize her for sure!

Oh yeah, it was my birthday last week.  I spent it, and the weekend, working on a few sewing projects.  One being a birthday present for my sister.  Her's is coming up in May.  Until then, we are the same age!  Pretty cool huh?  Anyway, I've been piecing blocks for a quilt for her and I also made a table topper for a Mother's Day present for my other mother in England.  I used all fat quarters for this project.  It measures about 35" X 35."  


The middle block is a friendship star.  The other 8 blocks are Disappearing 9 Patches.  I discovered this block while surfing the internet for ideas.  I found a great step by step guide to creating this block at Cluck Cluck Sew.  Basically, just make a nine patch block then cut it in half vertically and horizontally.


Now you have four patches.  Rearrange your squares however you like.  The combinations are endless.


Next, just sew it back together.  This works.  Right?


Arrange all your blocks however you'd like!  I love that it looks a lot more complicated than it is!


I pieced the the back of the table topper, too.  I also used the technique of folding over the back fabric to the front to bind it.


My quilt lines are pretty visible in these pictures.  Oops, and some of them are a little wobbly!  Hey, I'm still a beginner!


Thanks to all for the birthday wishes and gifts...you know who you are!

Tootles! 
Blog Signature Pin It

Sunday, February 5, 2012

My First Quilt: DONE!


It's done!  I worked all week on it and finished up my first quilt Saturday night.  I ran into a few hiccups along the way, but overall I'm happy with how it turned out.  My hiccups?  First, I tried basting the quilt sandwich using Heat N Bond "tape" as described by Nancy Zieman in Sewing A to Z .  This did not work.  I guess my sandwich was too thick to heat all the way through.  I went out and bought basting spray.  It rocks!  Problem solved!  The second problem...the yellow flag, above the bird, frayed and came away from the satin stitched edge when I washed the quilt. I tried "patching" the spot, but, to me, the flaw is obvious.  I'm still glad I started my quilting journey with applique.  Next time, however, I will cut my pieces a little larger and make sure to watch all fabric prior to cutting and sewing!  

Even with the flaws, I'm still happy with it...and pretty proud of myself for quilting it myself!  All those (straight) lines!  I didn't use my new walking foot for the quilting, but I did use the transparent thread I bought.  Wow.  It is like fishing line!

Quilt back (closeup)
I folded the back fabric over to the front and used it for the binding.  I found this method pretty easy and will use it again for my next quilt!  
Fold over binding
So, what do you think?  Thanks again to Polly at Helping Little Hands for the great Bird and Bunting Quilt Tutorial.  Any good ideas for what I should do for my next quilt?  I'm on the hunt for another great pattern!

Have a great week!
Tootles! 

   Blog Signature Pin It

Tuesday, November 22, 2011

Transfer Artist Paper (TAP) Project


Where to begin?  I've gone nearly another week between posts!  I'm afraid I've been a slacker blogger of late.  I'm sorry.  I promise to get my blogging act together!  So what have I been doing this past week?  Well, besides the torture, I mean, physical therapy, I organized a birthday party for my now seven year old daughter!  The party was a success...even the cheetah print cakes!  I also got a bit of sewing done.   I  completed a couple of projects for my Craftaholics Anonymous Handmade Gift Exchange partner.  Unfortunately, I can't show you what I made for her just yet, but I can show you a few other sewing gifts I've made this past week.  Be sure to check out all the handmade gifts exchanged at Craftaholics Anonymous in the coming weeks!  My partner should be receiving her gifts soon!  I hope she loves them!  I can't wait to see what she has made for me, too!

A Fairy Journal Cover

Spaceship Ear Bud Case

Spaceship Ear Bud Case (back view)

I made the Fairy Journal cover for my friend, Molly.  (I hope she isn't reading this post!)  I used TAP (Transfer Artist Paper) to transfer the fairy image.  I must say, I was pretty impressed with TAP.  The image transferred to the canvas fabric perfectly!  I embellished the image using beads and embroidery.  I made the ear bud case for her little boy, Tucker.  I found the pattern and tutorial for the case at Dog Under My Desk blog via Craft Gossip.  I think it turned out cute and it was really easy, and quick, to sew.  These are great for using up fabric scraps and would make great stocking stuffers, too!

For all you readers in the United States, have a terrific Thanksgiving.  Enjoy your day of turkey, sweet potatoes, cranberry sauce, and of course pumpkin pie!  I made a "practice" pie a few days ago...

Yummy!

I also made a fantastic meal of chicken and dumplings this week.  The recipe would also be great for your leftover turkey.  


I leave you with my mom's recipe for awesome dumplings:

4 eggs
1/2 cup milk
pinch salt
flour until stiff
Drop in boiling soup and cook for about 15 minutes

Happy Thanksgiving!
Blog Signature

Sunday, June 5, 2011

Adjustable Fabric Strap Tutorial Update

It seems like ages ago that I wrote my first sewing tutorial.  It was actually in March last year that I posted a tutorial based on Nancy Zieman's adjustable fabric straps for purses and bags.  I hadn't realized until relatively recently that many crafters have come to my blog and some even became "followers" after seeing my tutorial on other websites and blogs, including Craft Gossip and Totally Tutorials.  So, I'm really grateful to those sites and others for re-posting this tutorial.  I'm also thankful to Nancy Z. Without watching her show on my local PBS channel, I'm not sure I would have even thought that I could make my own purse, let alone adjustable straps.  She is my sewing hero.

So why am I talking about this tutorial?  Well, over the past year, a few people have emailed me in frustration regarding the instructions.  I've tried to explain the steps via email to them, but I'm afraid these steps are best understand through pictures.  I'd actually like to make a video and post it, but I'm certain I'm not to that level of blogging just yet!  Carla is one of those frustrated emailers.  Instead of trying to explain the steps in an email, I've decided to re-do some of the steps that are probably the most confusing and write an "updated" tutorial here.  Please note that I have used fabric scraps and haven't even used matching scraps for the slides.  I also have not used interfacing here, which is actually really important for successful adjustable straps.  Please review the original tutorial for more detail regarding measurements, interfacing, etc.  Let's get to it!

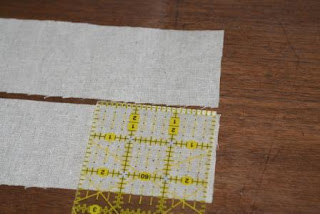
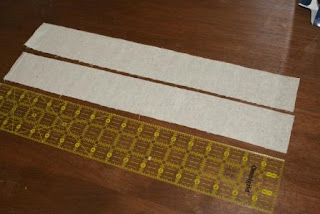
1.  I first cut two pieces of fabric 2 1/2" wide X 18" long.  You will also make two fabric slides.  You'll want these a half (or more) narrower than your completed straps.  You'll need to make sure you make them long enough to cover the width of the strap plus 1/4".


2.  Next, I folded and ironed the long ends toward the middle.  I did this on both straps.  NOTE:  You would iron interfacing to the long pieces before folding if you were making actual straps for your bag.  Again, the interfacing you use here is really important.  Here's an inside secret:  I always use Dritz Perfect Waist Maker instead of regular interfacing for my bag straps.


3.  Now fold over your strap in order to find the middle.  Press to mark this spot.


4.  Now, just below this fold, open the strap and measure.  You are going to make your fabric slides about 1/4"  longer than the width of the opened (and NOT sewn) fabric strap.  In the second photo below, I'm pointing to where I will cut the green slide fabric.


5.  Now, on the right side of the strap fabric (brown), pin the slide fabric (green) cut end to cut end.  Sew the fabric slide to the strap fabric just where you see the pins.


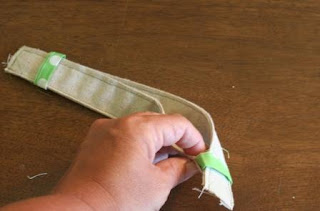
6.  Once you have sewn on the slide, refold the long sides of your strap and press.  Now, with wrong sides together, fold your strap in half.  You will now edgestitch the strap.  Sew down one long end and when you reach the fabric slide, stitch close, but do not sew over it.  Then, sew down the other side of the strap.  I've used green thread for this step in hopes you can see the stitches.  In the last photo in this step, I am pointing to where I sewed across the strap near the slide.


7.  Repeat the steps in order to make the second strap.  It should look exactly like the first!


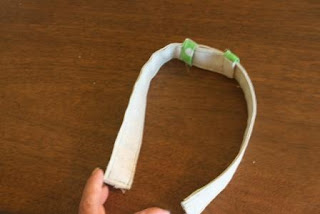
8.  Now you are going to "stack" the slides.  To do this, lay one strap with the top of the slide up.  Take the other strap and lay it with the slide touching the table surface, or down.   Look at the above photo and imagine the slide on the first strap was facing down.  This is the position you'll want in order to insert one end of one strap into the slide of the other strap.  Repeat for the other end.


If you've done this correctly, one slide will appear "upside down."  In other words, you'll see the backside of one slide while the other will appear "right side."  Now just attach your strap, which is now just one (you started with two), to your bag in whatever method you want!

I hope this all makes better sense.  Study an old purse or bag that has an adjustable strap in order help you get a visual perspective, which is sometimes hard with only photos and words.


Signature for Blog

Saturday, April 9, 2011

Make Something Saturday: Purses & Bags


Lush Stuff Pretty Shoulder Bag

Happy Saturday!  I hope everyone is doing great!  Personally, it's been one heck of a week for me!  I've been busier than ever and just hope to enjoy a creatively quiet weekend.  I do have a few "to dos" to get done including completing my  Art Deco April Dress!  Be sure to have a look at the dresses already posted HERE.  

Besides my paper dress, I do want to get some more sewing done.  I've been working hard on card wallets, box bags, and zip pouches.  I hope to slip in making a new purse for myself sometime during the weekend, too!  Is that selfish?  Don't answer that!  For some new purse inspiration, I've been doing a bit of web surfing.  Here are a few purse projects that might inspire you this weekend as well!

Hobo Bag at Think Liz (PDF available)
Friday Night Clutch at Sew A Straight Line

The Project Corner's A Line Purse

These are all great tutorials!  If you decide to make a new bag for yourself and you want to change up the strap...and make it adjustable, click HERE for my Adjustable Fabric Strap Tutorial or if you like the look of a belt buckle for your purse strap, click HERE for that tute!

Happy Sewing and have a super weekend!
Signature for Blog

Saturday, April 2, 2011

Make Something Saturday: Kitchen Sewing Tutorials

Annette & Friends Photo


Happy Saturday!   As usual, we've experienced the ups and downs of Spring weather here in my neck of the woods.  Today is supposed one of those up days!  The sun is out, the birds are chirping, and the grass is green!  If the weather isn't so great where you are, why not get out your sewing machine and make something?  This week's tutorials are for kitchen accessories.  Have fun!  I'd love to see what you create!


TOWELS

Little Birdie Towels
Back To Domestics Towels
Ribbon Dish Towels from AestheticNest

APRONS

 Crafty Dame Vintage Pillowcase Apron 
Craftwhatever Tea Towel Apron
Gingercake Flirty Apron (PDF available)

Please don't forget to check out the Art Deco Dresses already on parade.  I've added a clickable image on my sidebar to take you directly to the links post!

Have a great weekend!
Signature for Blog