Showing posts with label adjustable straps. Show all posts

Sunday, June 5, 2011

Adjustable Fabric Strap Tutorial Update

It seems like ages ago that I wrote my first sewing tutorial.  It was actually in March last year that I posted a tutorial based on Nancy Zieman's adjustable fabric straps for purses and bags.  I hadn't realized until relatively recently that many crafters have come to my blog and some even became "followers" after seeing my tutorial on other websites and blogs, including Craft Gossip and Totally Tutorials.  So, I'm really grateful to those sites and others for re-posting this tutorial.  I'm also thankful to Nancy Z. Without watching her show on my local PBS channel, I'm not sure I would have even thought that I could make my own purse, let alone adjustable straps.  She is my sewing hero.

So why am I talking about this tutorial?  Well, over the past year, a few people have emailed me in frustration regarding the instructions.  I've tried to explain the steps via email to them, but I'm afraid these steps are best understand through pictures.  I'd actually like to make a video and post it, but I'm certain I'm not to that level of blogging just yet!  Carla is one of those frustrated emailers.  Instead of trying to explain the steps in an email, I've decided to re-do some of the steps that are probably the most confusing and write an "updated" tutorial here.  Please note that I have used fabric scraps and haven't even used matching scraps for the slides.  I also have not used interfacing here, which is actually really important for successful adjustable straps.  Please review the original tutorial for more detail regarding measurements, interfacing, etc.  Let's get to it!

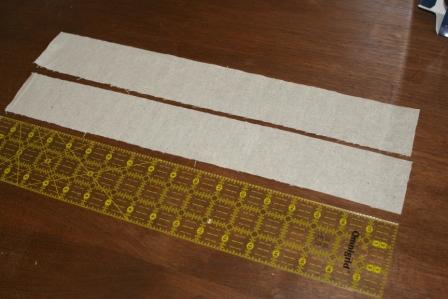
1.  I first cut two pieces of fabric 2 1/2" wide X 18" long.  You will also make two fabric slides.  You'll want these a half (or more) narrower than your completed straps.  You'll need to make sure you make them long enough to cover the width of the strap plus 1/4".


2.  Next, I folded and ironed the long ends toward the middle.  I did this on both straps.  NOTE:  You would iron interfacing to the long pieces before folding if you were making actual straps for your bag.  Again, the interfacing you use here is really important.  Here's an inside secret:  I always use Dritz Perfect Waist Maker instead of regular interfacing for my bag straps.


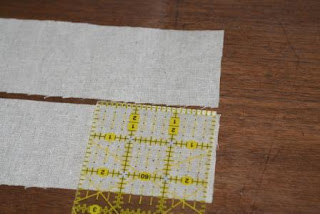
3.  Now fold over your strap in order to find the middle.  Press to mark this spot.


4.  Now, just below this fold, open the strap and measure.  You are going to make your fabric slides about 1/4"  longer than the width of the opened (and NOT sewn) fabric strap.  In the second photo below, I'm pointing to where I will cut the green slide fabric.


5.  Now, on the right side of the strap fabric (brown), pin the slide fabric (green) cut end to cut end.  Sew the fabric slide to the strap fabric just where you see the pins.


6.  Once you have sewn on the slide, refold the long sides of your strap and press.  Now, with wrong sides together, fold your strap in half.  You will now edgestitch the strap.  Sew down one long end and when you reach the fabric slide, stitch close, but do not sew over it.  Then, sew down the other side of the strap.  I've used green thread for this step in hopes you can see the stitches.  In the last photo in this step, I am pointing to where I sewed across the strap near the slide.


7.  Repeat the steps in order to make the second strap.  It should look exactly like the first!


8.  Now you are going to "stack" the slides.  To do this, lay one strap with the top of the slide up.  Take the other strap and lay it with the slide touching the table surface, or down.   Look at the above photo and imagine the slide on the first strap was facing down.  This is the position you'll want in order to insert one end of one strap into the slide of the other strap.  Repeat for the other end.


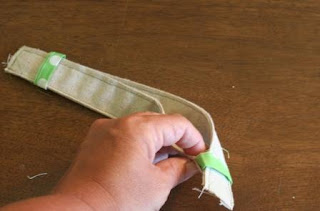
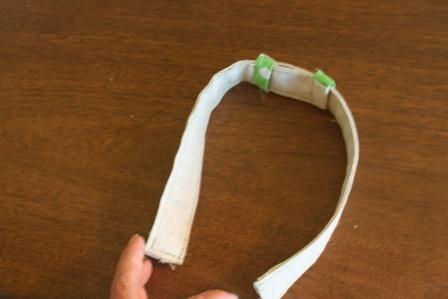
If you've done this correctly, one slide will appear "upside down."  In other words, you'll see the backside of one slide while the other will appear "right side."  Now just attach your strap, which is now just one (you started with two), to your bag in whatever method you want!

I hope this all makes better sense.  Study an old purse or bag that has an adjustable strap in order help you get a visual perspective, which is sometimes hard with only photos and words.


Signature for Blog

Wednesday, June 2, 2010

Simplicity 2616: Done Deal


I hope everyone had a fun and safe Memorial Day weekend.  Mine was spent working.  The long hours paid off and justice has been served.  That said, I spent this evening finishing up Simplicity 2616.  I decided to make View D.  I found the instructions actually fairly easy to follow and didn't run into much trouble at all, although I may not have inserted the elastic tight enough.  If, after I wear the top, I decide the shoulders and neck should be tighter, I will open up the casings and pull the elastic to shorten.  I really like the fabric I chose.  It is a cream colored linen-look with embroidered black flowers.  The downside here is that it is a bit heavy.  What do you think of this look? 
Bottom line on this pattern:  Pretty easy.  I will definately sew another view using a different fabric. 


I'd like to thank Rachel from One Pretty Thing for her kind words regarding my Adjustable Strap Tutorial.  She found my tute at Craftaholics Anonymous and then posted it on her site!  I'd love to see photos of any projects made using my tute! 

I hope you've noticed my "Grab" button!  I finally figured it out!  Yeah!  I was feeling pretty techno hip with this accomplishment until I realized that my "Email Me" button isn't functional!  Any suggestions?

Bye for now.
Angela

Thursday, May 13, 2010

Tutorial Fixed!

Thanks to Rachelle for sending me the head's up that two photos were missing from my adjustable strap tutorial! I'm not sure how they disappeared, but they are back now. Also, thanks for checking it out. I hope you try this tutorial and be sure to send my a photo of your finished bag!

Butterick 5363

I've been working on an outfit the last few days...when I can sneak a few minutes that is. This outfit will be my first ensemble for myself. I'm using Butterick pattern 5363. I've completed the pants and am working on the tunic now. I'm hoping to complete the jacket and wear the whole outfit this weekend. I'm using black seersucker fabric for the pants and jacket and a grey and black seersucker for the tunic. So far, I've accomplished a few sewing firsts for me:
  1. successfully laying out and cutting out the pattern peices from 60" wide fabric
  2. successfully positioning and cutting (I think) the plaidish fabric pieces for the tunic
  3. a buttonhole!

For fear I might jinx myself, I don't want to say that I haven't had any mishaps...but, this project has proven, so far, mistake and injury free! Keep you posted!

Angela

Thursday, April 1, 2010

iTouch Cover added to the "To Do List"

First, let me again say thanks to all who followed the links from Totally Tutorials and Craft Gossip to Sew Loquacious to check out my adjustable fabric slide tutorial!  Also, thanks for the emails and great feedback!  It really means a lot to me to get everyone's input!  I am so (SEW) excited to do another tutorial!
Speaking of tutes, I found a one for making an iTouch (or iPhone) cover at Dog Named Banjo that I am going to try.  Last weekend, after filling my 2 GB iPod to capacity, I got a brand new 32 GB iPod Touch.  It is so cool...it has WiFi!  I guess I figured now that I have joined the 21st Century (according to my daughter), I decided I needed this cool gadget.  I love it.  I don't love the case I bought for it, however.  Hence, I began searching for patterns in order to make my own.  I really like the fabric Robyn used for her iTouch, too.  Check out her web page for the tutorial at:  http://www.dognamedbanjo.com/2010/01/13/tutorial-ipod-touch-cover/
Here is a photo from her site:

My to do list now includes getting the rest of my supplies I need to start on the Butterick top, starting on this top, and making this cover for my iTouch.  BTW, I cut out the pattern pieces for the top earlier this evening and began reading the pattern.  At first glance, it appears "doable" and fairly tres facile, but we'll see...
Until next, let's be careful with those sewing machines!

Sunday, March 28, 2010

Tutorial Posted!

I am so excited that my adjustable fabric strap tutorial has been posted on Totally Tutorials!  Thanks to all who have followed their link to my blog!  I hope that anyone interested in making these adjustable fabric straps will view my tute and, if there are any questions, or something isn't clear, please email me with your questions or comments!  This was my first tutorial.  I hope to write many more, so I want to make sure that my instructions are clear. 

Thanks again to Totally Tutorials www.totallytutorials.blogspot.com and also a big shout out to Nancy Zieman

Angela

Friday, March 5, 2010

A Tutorial....Finally


Well, I wrote a tutorial today about making an adjustable purse strap using fabric slides. I followed Nancy's steps to the letter, except for the length, and the strap turned out great! I'm not sure my how-to explains the process as descriptively as Nancy does in the 12 Easy Sew Bags episode I've watched over and over (and over) again, but I think it comes close. The bag I made (red and khaki plaid) is not from a pattern, although I did use Simplicity pattern #2830 for the size and shape, but the design is my own.
I used this same Simplicity pattern for size and shape for another bag I made this fall. I used bias tape on this bag, which was a first. I really like how it turned out. It is the black and white bag shown above. (I wish I could find a tutorial on how to add photos to posts)
Have a look at the how-to and let me know what you think. I've also added a few project photos of a summer halter top I made out of scrap fabric. I think it turned out really cute. I am definately going to try that one again in an adult size (for me and my tan)!
A.


Saturday, February 27, 2010

Grommets: Not as easy at it seems


Okay, I was hoping to complete my grommet bag by the end of the weekend....I have decided to scrap the whole thing and start over...maybe I should actually get a pattern??? Just a thought. After wasting half of the package of grommets, I figured out how to install them in the bag fabric edges, sort of. I then continued sewing the bag. By the way, I used thick sew in fleece interfacing for the first time. I sewed the velcro pieces on the outside of the bag fabric as well as on the underside of the flap fabric. I basted (I never do this) the flap to the bag and made sure the velcro lined up...it did. Yeah. Then, when I pinned the lining and the outer bag together, I realized the biggie...I didn't insert the grommets into the lining...just the outer bag and interfacing!!! What the **@!

As promised in an earlier post, however, I did complete Nancy's adjustable straps using fabric slides. I watched the video again and I successfully made adjustable straps. Since this was basically for practice since I have now decided against the bag, I didn't freak out when I realized that I followed Nancy's instructions too closely. 36" strips turn out to be 18" straps when they are done. This is way too short. Well, I've got the concept down now, so I should be able to make them whatever size I want. I've posted some photos. I will definitely try this one again on another bag.

On a happy note, I managed to sneak into my fave fabric store today. I picked up the most delicious yard. I've been eyeing this Anna Maria Horner fabric ever since I first saw it. I have no idea what I will make with it, but it doesn't matter. I just love it. I posted a photo of it. It is from Drawing Room. Isn't is gorgeous?
On another note...I want to apologize to my daughter. I'm sorry. I'm really going to try not to be such a helicopter mom...this time I mean it. I love you.
A.


Friday, February 19, 2010

Messenger Bag Complete!


I managed to complete the appliqued messenger bag I started the other night. I feel like it turned out pretty nice considering I have never made one before and I really didn't have a pattern to go by. I kept the single, non-adjustable (sorry Nancy), strap. I didn't feel like ripping it out and starting over...or cutting a new strip. I do solemnly swear that the next bag I make, I will attempt the adjustable straps. I promise.


Thursday, February 18, 2010

Nancy, I'm Sorry

I'm sorry Nancy. I have failed to create your adjustable straps. Last night I made the straps for my messenger bag and thought I would be able to finish them a la adding the adjustable thingies today. I was wrong! After watching (again) Nancy make the straps (thank God I recorded this episode), I realized that I should NOT have sewn the straps together. In order to add the fabric "adjustable tabs" the straps should only be cut and pressed. So, I can either rip out both straps and start over (insert expletives here), cut two new fabric strips, or use the straps I've already made by sewing them directly to the bag or to d-rings I'll have to install. I haven't decided what I'll do yet.


Instead of stressing over how to "fix" my bag tonight, I decided to add a few more faves to my Crafty Faves list. I've also added a link to pages showing some of my recent projects. I've only added photos of the projects. The Zakka inspired purse matches the coin purse I detailed in my second post. The pajamas were made out of flannel I bought at JoAnn's. I had a pattern for the nightgown, but I totally winged the bed jacket by using just the top portion of the robe pattern that was included with the nightgown. The kimonos were really fun to make. I hope to add Tutorial pages in the future.


Wish me luck with my straps tomorrow!


Angela