Showing posts with label tutorial. Show all posts

Sunday, January 22, 2012

My First Quilt: Cut and Ready


This past week, I began work on my first quilt!  After much searching for the right first quilt, I decided the bird and bunting quilt I found at Helping Little Hands was perfect!  Polly's quilt is larger than mine, but I've followed her free template for the triangle banner as well as the bird template she provides on her blog.  She also provides a well written tutorial for the quilt.  I cut 28 triangles out of various fabrics.  Choosing the fabrics was by far the hardest part of this process so far.  In the end, I decided on blue, red, and yellow.  


Since I'm partial to them, I made mine a blue bird!


I think the background fabric is perfect!  I'm going to start attaching my triangles as soon as I'm happy with placement.  Then, I'll attach the bias binding and then the bird.  Then the hard part right?  Actually putting it all together and quilting!  

Have a great Sunday everyone and a fabulous week!

Tootles!

Blog Signature Pin It

Wednesday, December 7, 2011

Letter Coasters: A Tutorial


As promised, I'm posting a "how to" on making your own ceramic tile coasters using individually printed letters.  The method is very similar to creating coasters using scrapbook paper, but, if you want to use printed letters, there are a few extra steps.  First, let's gather the materials needed:

  • ceramic tiles (mine are smooth, off-white, and measure 4 1/4")
  • felt or cork (for these I used sticky back felt)
  • Mod Podge (glossy or matte)
  • super glue (optional) 
  • foam brush
  • letters
  • high quality (acid free) paper
  • printer
  • spray clear acrylic sealer (I used glossy)
  • brayer (optional)

Buy your tiles.  I found mine at Home Depot and paid $.16 each. Now, find your letters.  Through Pinterest, I found a Flickr collection of letter photos.  There are hundreds of photographs of all letters of the alphabet.  The collection's owner states they are free to download for non-commercial use only.  

Sizing the letters
Now that you have found each letter you want to use, download and save each to your Desktop (you can find them easily here).  You'll have to size them before printing.  Start by opening a blank WORD document and then insert your first photo.  Look in the upper right on the photo above.  You'll see the Crop tool.  Use this tool to size your photo to a little smaller than your tile size.  By using this tool, you will achieve an exact size for each square.  I cropped my letters to 4.1". 

Print the letters
Decide if you want your coasters to be colorful or not and then print in color or choose black and white.  Print your letters on high quality paper.  I used acid free resume paper, but you could used plain scrapbook paper or even card stock.  In order to avoid smearing, make sure you allow the printed papers to "dry" before the next steps.     

Trim the letters
Trim each letter and make sure each square will fit on the top of your tile.

Paint a thin layer of Mod Podge on tile


Adhere each letter
Adhere each letter square to the tiles.  Using a foam brush, "paint" a very thin layer of Mod Podge to the top of one tile.  Next, place a letter square on top of the tile.  You won't have a lot of time because the thin layer of Mod Podge will dry quickly.  So, make sure your letter square is straight.  Use a brayer or your fingers and gently rub the paper onto the tile.  Bubbles are the enemy here, so take your time and make sure there aren't any under the paper.  Adhere each letter square in this fashion.  Once you've completed each letter, go back to the first square and double check there are no bubbles.  Then, "paint" a thicker layer of Mod Podge on top.  Complete another layer on each tile.  Let dry between layers.  For "LORA," I  used two layers of Mod Podge.

Sticky back felt
Once the tiles are dry, it's time to prepare the backs for a felt or cork covering.  I used cork for one set of tiles, but I found it a bit harder to work with than sticky back felt.  One package of Prestofelt costs less than $2.00 and is enough to cover four tiles.

Prepare the backs

Adhere the felt
Although the felt has a sticky back, I decided to use a couple of globs of super glue for extra strength.  I placed globs of glue in each corner and one in the middle.  I cut the correct size before removing the paper back from the felt.  Then place the felt on the backs of each tile square.  Super easy!

Seal each tile
It's time to seal the tiles, which will make them water proof.  Take them outside if possible for this step.  The sealant is pretty stinky.  Spray a layer of sealer on each tile.  Let dry and spray another layer.  I used two layers, but you can do however many looks good to you.  Keep in mind, however, that the more layers, the more tacky it may feel.  Also, you run the risk of bubbles...they are the enemy!


Let the tiles dry completely.  That's it!

Obviously you can make more tiles if the name you want to spell out is longer.  A black and white version would also be very attractive.  Really, the possibilities are endless...imagine using photos of a bridal couple to give as a wedding gift or photographs of your kids to give to the grandparents as gifts.  These are a very simple and inexpensive project that makes a great personal gift!

I hope you give this project a try!

Tootles!
      

Blog Signature

Monday, December 5, 2011

Finding Christmas MoJo


It's beginning to look a lot like Christmas!  And feeling like it, too!  I must confess.  I usually begin the holiday season with great intentions for being "Christmasy," but I always fall short and end up feeling a little "Scroogish" by Christmas day.  I'm not sure why, but I suspect it is a combination of the stress of shopping, fighting the crowds, money (spending it), as well as realizing that I'll never actually attain that same Christmas feeling I had as a child.  This year, however, I'm feeling the spirit.  I'm on a roll!  Don't tell anyone, but I've been listening to Christmas music...and might even been singing a few songs, too!  I've been crafting, sewing, decorating and baking!  I can't wait to show you a few of the presents I've made, but first, what do you think of the awesome cork board pictured above?  Meaghan, my Handmade Gift Exchange partner sent me a box of goodies which included the hand painted frame with an inserted cork board, handmade push pins that look like vintage typewriter keys, plus shells from the Outer Banks and hot cocoa mix from England!  I absolutely love everything she sent.   If you missed the photographs of the journal cover I sent Meaghan, have a look at this previous post.  Participating in the Craftaholics Anonymous gift exchange has been such a great experience.  I'm so happy I have gotten to know Meaghan; I feel I've made a true friend.  Thanks again to Meaghan for the thoughtful gifts and to Linda for hosting the exchange!  

If you are a Pinner, no doubt you've seen the pins about making your own coasters using ceramic tiles, Mod Podge and scrapbook paper.  In the last few days, I've made two sets of coasters to give as gifts.  I made the first set of four using scrapbook paper.  I backed these with cork I had on hand.


I tried something a bit different for the next set of four.  Instead of using patterned scrapbook paper, I used regular paper that I had a printed individual letters onto.  Again on Pinterest,  I found a link to a Flickr collection of letter photographs.  After scrolling through hundreds of l's, o's, r's, and a's, I found the perfect letters to spell out, "Lora."  I printed these letters and adhered them onto my 16 cent tiles.


I backed these tiles with felt.  I really like how the turned out.  I will be posting a "how to" in the coming days if you are interested in making your own.  So, stay tuned!

Besides the coasters, I  completed a few sewing projects, too.  I've made two French press cozies with matching mug rugs, as well as a zebra print pillow.  (I forgot to photograph the mug rugs)  


Wow, where has the time gone?  I haven't even gotten to show you the goodies I've been baking up!  I must run for now, but look for a few scrumptious Christmas candy recipes, as well the tutorial for my version of tile coasters in my next post!

I hope you are enjoying this Holiday Season.  I know the Holidays can be difficult at times for some, including myself, but, at least for the moment, I have found my Christmas Spirit...and I'm holding on tight!  

Tootles!
Blog Signature


Monday, August 1, 2011

New Image Transfer Zippy Bags


Is it Friday yet?  Wow, it's only Monday and I am so ready for the weekend!  I got a few bags completed this past Saturday and I want to get back into my sewing studio to keep it going.  I got to spend most of the day in my sewing studio.  It was so great....just me and my Janome.  I finished up a few "free-motion" bags as well as a couple of image transferred zippy bags, including the one pictured above.  I embellished the Cowgals bag with some beads and embroidery, as well as some ribbon on the bottom.  Here is a look at the back of the bag as well as the inside:


I transferred another image, this one depicting an old bicycle messenger service.  I didn't embellish this image. Instead, I "patchworked" the back of the bag.

"Adams Express"


You might recognize the fabric I used for the rear of the bag.  It's that scrumptious Etsuko Fuyura designed Echino fabric I used for my daughter's Sweet Pea purse.  Still love that fabric!

I am really pleased with how the images transferred.  I still think the results achieved using the gel medium transfer method is so much better than printing directly onto computer "fabric."  It's just more genuine, if that makes sense.  Anyway, read through my Image Transfer Tutorial and give it a try...I think you'll be really impressed!

Stay cool everyone!  It was officially 104 degrees outside as I drove home this afternoon...and I just heard tomorrow is supposed to be the hottest day of the year!!  Ugh!

Tootles!
Signature for Blog

Sunday, June 5, 2011

Adjustable Fabric Strap Tutorial Update

It seems like ages ago that I wrote my first sewing tutorial.  It was actually in March last year that I posted a tutorial based on Nancy Zieman's adjustable fabric straps for purses and bags.  I hadn't realized until relatively recently that many crafters have come to my blog and some even became "followers" after seeing my tutorial on other websites and blogs, including Craft Gossip and Totally Tutorials.  So, I'm really grateful to those sites and others for re-posting this tutorial.  I'm also thankful to Nancy Z. Without watching her show on my local PBS channel, I'm not sure I would have even thought that I could make my own purse, let alone adjustable straps.  She is my sewing hero.

So why am I talking about this tutorial?  Well, over the past year, a few people have emailed me in frustration regarding the instructions.  I've tried to explain the steps via email to them, but I'm afraid these steps are best understand through pictures.  I'd actually like to make a video and post it, but I'm certain I'm not to that level of blogging just yet!  Carla is one of those frustrated emailers.  Instead of trying to explain the steps in an email, I've decided to re-do some of the steps that are probably the most confusing and write an "updated" tutorial here.  Please note that I have used fabric scraps and haven't even used matching scraps for the slides.  I also have not used interfacing here, which is actually really important for successful adjustable straps.  Please review the original tutorial for more detail regarding measurements, interfacing, etc.  Let's get to it!

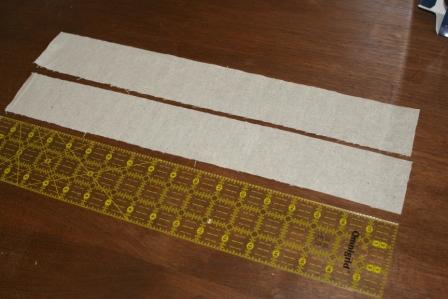
1.  I first cut two pieces of fabric 2 1/2" wide X 18" long.  You will also make two fabric slides.  You'll want these a half (or more) narrower than your completed straps.  You'll need to make sure you make them long enough to cover the width of the strap plus 1/4".


2.  Next, I folded and ironed the long ends toward the middle.  I did this on both straps.  NOTE:  You would iron interfacing to the long pieces before folding if you were making actual straps for your bag.  Again, the interfacing you use here is really important.  Here's an inside secret:  I always use Dritz Perfect Waist Maker instead of regular interfacing for my bag straps.


3.  Now fold over your strap in order to find the middle.  Press to mark this spot.


4.  Now, just below this fold, open the strap and measure.  You are going to make your fabric slides about 1/4"  longer than the width of the opened (and NOT sewn) fabric strap.  In the second photo below, I'm pointing to where I will cut the green slide fabric.


5.  Now, on the right side of the strap fabric (brown), pin the slide fabric (green) cut end to cut end.  Sew the fabric slide to the strap fabric just where you see the pins.


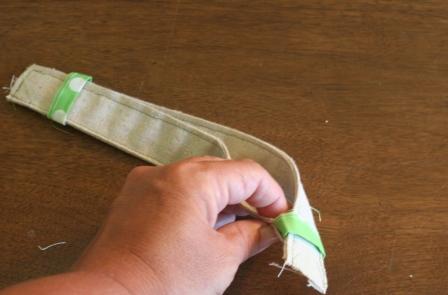
6.  Once you have sewn on the slide, refold the long sides of your strap and press.  Now, with wrong sides together, fold your strap in half.  You will now edgestitch the strap.  Sew down one long end and when you reach the fabric slide, stitch close, but do not sew over it.  Then, sew down the other side of the strap.  I've used green thread for this step in hopes you can see the stitches.  In the last photo in this step, I am pointing to where I sewed across the strap near the slide.


7.  Repeat the steps in order to make the second strap.  It should look exactly like the first!


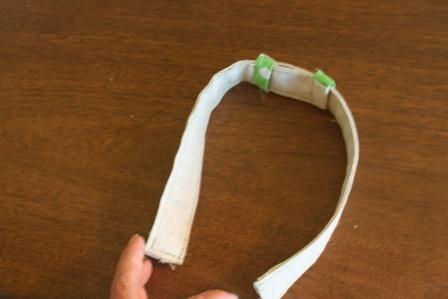
8.  Now you are going to "stack" the slides.  To do this, lay one strap with the top of the slide up.  Take the other strap and lay it with the slide touching the table surface, or down.   Look at the above photo and imagine the slide on the first strap was facing down.  This is the position you'll want in order to insert one end of one strap into the slide of the other strap.  Repeat for the other end.


If you've done this correctly, one slide will appear "upside down."  In other words, you'll see the backside of one slide while the other will appear "right side."  Now just attach your strap, which is now just one (you started with two), to your bag in whatever method you want!

I hope this all makes better sense.  Study an old purse or bag that has an adjustable strap in order help you get a visual perspective, which is sometimes hard with only photos and words.


Signature for Blog