Showing posts with label applique. Show all posts

Wednesday, May 30, 2012

Ocean Inspired Fabric and Quilt Blocks


I'm so thrilled to have received my Ocean Waves Batiks fat quarters a few days ago!  I fell in love, again, with the collection after opening the package.  They are beautiful!  I've been searching the internet and books, including 5,500 Quilt Block Designs by Maggie Malone, for a quilt pattern using these fabrics.  I want to use a block design that makes the fabric appear to be moving...like a wave.  I came across the Snail's Trail and the Journey to California blocks. 

Snail's Trail Block from About.com
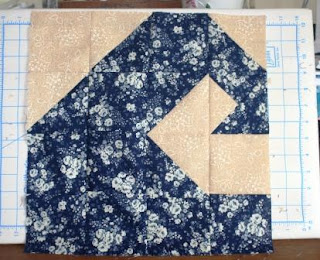
The blocks look very similar.  I think they look pretty "wave-like," but if I could only use the "top" of the block.  Hmmm.  Here is what I've come up with:


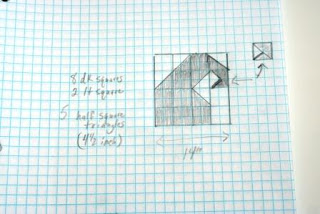
I've been cutting up my scraps for several days so I had a bunch right in front of me to experiment with.  I used 8 blue squares and 2 off-white squares plus 5 half square triangles.  The block that ends the wave was the hardest for me to figure out.  I haven't made anything like this square before.  Here is my sketch on graph paper (drawing on graph paper makes me a real quilter now huh?):


I'm not sure what this "special" square is called, or even if it a real design.  Basically, it's a blue triangle sewed to two smaller, one blue and one off-white, triangles.  I decided on a 16 patch block.  It measures at 14 inches completed.  I think I'll stick with this size, but now I need to decide the design for the overall quilt. I have 12 batik fat quarters to work with and have purchased a white on white solid to use as well.  Any ideas?  

I mentioned earlier that I have been cutting up my scraps for the past several days.  I started this project while cleaning up and cleaning out my sewing room, AKA my studio.  My fabric stash was so disorganized!  I'm not nearly finished, but I did come across some fabric I forgot I had.  Before I knew what a charm pack was, a friend gave me one.  It is called, Wildflower Serenade.  It's from Moda.  I decided to use up these charms to make a table topper for my friend who gave me the fabric.


I made the center heart applique using cut up charms and fusible web.  I "quilted" the heart with off-white thread.  I quilted the rest of the piece with clear thread.  I had several four patches leftover, so I made a hooped wall hanging to match.  I bought the wooden hoop for $1.00!  


I hope everyone is enjoying the beginnings of summer!  I have several sewing projects in the works, including a couple of vintage dresses for my oldest daughter, a blouse for me, and more skirts for my littlest daughter.  I'm also going to tackle a baby Jon Jon for my cousin's newest little one!  I cannot wait to start on my Waves Quilt!  I am thinking that project will go to the top of my list! 

Tootles!

Blog Signature Pin It

Monday, February 27, 2012

A Scrappy Half Square Triangle Quilt!


Time seems to have flown by!  Since getting my bionic knee in September, several holidays have passed, including Halloween, Thanksgiving, Christmas, New Year's, Valentine's Day, and even MLK Day!  I didn't work full time during my recovery, but I did go to physical therapy five days a week!  I'm happy to report, finally, that I have graduated (again) from therapy!  Yes, I even have a t-shirt to prove it!  The downside to this, however, is that I have been released for full duty work!  So, for the past few days I have been working...NIGHTS!  I haven't worked the night shift for a very, very long time.  So, not only am having to get used to work again, I have to adjust to vampire hours!  Anyway, I wanted to update you on a few of the things going on in my personal life.

As for things going on in my sewing life, you should know I still have the quilting bug.  As you may know, I made my first quilt a few weeks ago.  It was appliqued.  After that, I made a small art quilt.  So I decided I should try a traditional quilt next.  After looking through many books and searching the internet for inspiration, I decided to do a scrappy half square triangle quilt using white and colored fabric from my stash.  Once I started cutting the first several squares, I could see a hot pink color theme beginning.  I decided to go with this.

  
Sorry, it's a weird angle shot.  Here I have laid out 88 half square triangles.  I actually cut 104, but  decided 88 was the best layout design.  Next I sewed them together.


Starting to look pretty cool right?  I decided to add borders.  First, a scrappy border.


See it on the left edge?  I also added hot pink borders to the top, bottom, and sides.  


The top and bottom borders are wider than the sides.  The quilt top is now complete and measures in at 42 1/2" X 60."  It's my biggest quilt so far!  Now I just need to get started on the backing, which will be white.  Then, make my quilt sandwich, baste it, and then start quilting!  That's the scary part.  Do I want to attempt quilting this one?  If so, how?  Straight lines?  Stippling?  Free motion?  Any suggestions?  

I hope you all have a terrific Monday!  I'm off to bed!

Tootles!
Blog Signature Pin It

Sunday, February 5, 2012

My First Quilt: DONE!


It's done!  I worked all week on it and finished up my first quilt Saturday night.  I ran into a few hiccups along the way, but overall I'm happy with how it turned out.  My hiccups?  First, I tried basting the quilt sandwich using Heat N Bond "tape" as described by Nancy Zieman in Sewing A to Z .  This did not work.  I guess my sandwich was too thick to heat all the way through.  I went out and bought basting spray.  It rocks!  Problem solved!  The second problem...the yellow flag, above the bird, frayed and came away from the satin stitched edge when I washed the quilt. I tried "patching" the spot, but, to me, the flaw is obvious.  I'm still glad I started my quilting journey with applique.  Next time, however, I will cut my pieces a little larger and make sure to watch all fabric prior to cutting and sewing!  

Even with the flaws, I'm still happy with it...and pretty proud of myself for quilting it myself!  All those (straight) lines!  I didn't use my new walking foot for the quilting, but I did use the transparent thread I bought.  Wow.  It is like fishing line!

Quilt back (closeup)
I folded the back fabric over to the front and used it for the binding.  I found this method pretty easy and will use it again for my next quilt!  
Fold over binding
So, what do you think?  Thanks again to Polly at Helping Little Hands for the great Bird and Bunting Quilt Tutorial.  Any good ideas for what I should do for my next quilt?  I'm on the hunt for another great pattern!

Have a great week!
Tootles! 

   Blog Signature Pin It

Sunday, January 29, 2012

My First Quilt: Appliques Attached


I'm so excited about how my first quilt is coming along!  It was quite a long process, but I completed attaching all the appliques using a satin stitch!  I've never used this stitch on my machine before!  Here are a couple of close up views:


I am very happy with the results.  I had no idea my machine, a Janome 4618LE, was capable of a satin stitch!  I guess I should read the owner's manual more often!


When I started this quilt project, I didn't realize  that a quilt top is actually several inches smaller than the chosen batting and backing fabric.  I assumed the top, batting, and backing would be the same size.  My batting size is 34" X 45."  My quilt top is 31" X 41 1/2."  I bought my backing fabric today.  I purchased 1 1/3 yards.  I hope to fold over my backing fabric to use as binding.  In case that doesn't work out for me, I bought a few packages of quilt binding.  No, I'm not being negative about it, just realistic.


My other purchases include a walking foot, quilting needles, transparent thread (and natural colored machine quilting thread), and labels.  I've never used any of these items before!  Wish me luck!  I'm going to start quilting as soon as my backing fabric comes out of the dryer!

Tootles!
Blog Signature Pin It

Sunday, July 3, 2011

Embroidery and Applique!


Guess what?  I won!  Backstory:  A few days ago I was reading about The Embroidery Project, an online embroidery class, on one of my favorite new blogs, Wild Olive.  From there,  I hopped over to a "new to me" blog called Ooh Leela and I entered to win a spot in the online embroidery class.  And...I won!  I am super excited about learning proper embroidery skills.  If you've read my blog in recent months, you know that I've been embroidering embellishments on my image transfer bags.  I've also been experimenting with free motion embroidery, too.  But, I haven't taken any classes, etc.  In other words, I've been winging it all this time.  Now, I'm going to actually learn how to do the different stitches the right way!

I've been pretty lazy this holiday weekend.  If you can believe it, I've only just finished the laundry from our vacation return last Sunday!!  I did get a chance to get into my sewing studio Saturday, however.  I worked on a few zippy bag fronts, including the above tattoo inspired applique.  I also made a quilt inspired front and a quirky "Spot of Tea" inspired bag front.  I think they turned out pretty cute....even if I finished them before I start my embroidery class!


When these bags are finished, they will be about 7" X 6".  I'm also adding charms to the zipper pulls.  More stuff for my Etsy Shop!!  

To all you in the U.S....have a wonderful and safe 4th of July!!  Happy Independence Day!

Signature for Blog

Saturday, March 13, 2010

Happy Saturday!


Whew! I made it through the week in one peice! Well, mostly. It was a crazy week and I really thought exhaustion was setting in. I stuck to my promise of spending at least 15 minutes in my lair everyday and because of this, I have staved off the aforementioned state of mind and completed a new bag I made using the Anna Maria Horner fabric I bought a few weeks ago! I made it about the same size and in the same way as the bird appliqued black messenger bag I posted about previously. I made the strap differently, however. I made it a bit shorter and a little more narrow. I also used heavier interfacing as this fabric needed a bit more weight. I used duck canvas when I made the black bag. I applied a magnetic snap to the flap on this bag as well as an inside pocket. Neither of which I had implemented on the black bag. So, I am pretty pleased with this new bag. Oh, I wish you could feel the fabric. There is a slight sheen to it and it is just delicious. I love it!

Friday, February 19, 2010

Messenger Bag Complete!


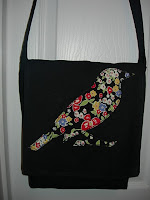
I managed to complete the appliqued messenger bag I started the other night. I feel like it turned out pretty nice considering I have never made one before and I really didn't have a pattern to go by. I kept the single, non-adjustable (sorry Nancy), strap. I didn't feel like ripping it out and starting over...or cutting a new strip. I do solemnly swear that the next bag I make, I will attempt the adjustable straps. I promise.


Wednesday, February 17, 2010

Can one wear too much fleece?


How much fleece is too much for one outfit? This is an age old question. Well, not really. My daughter questioned whether I might overdose on the amount of fleece I was sporting in one ensemble. Actually, I'm not a big fleece fan, but I wanted to show off my vest I had finally finished, so I wore it out when we went out shopping and then to dinner. Of course I was also wearing a fleece jacket, scarf, and mittens. Is this too much? I did not overdose, but I have concluded that fleece on fleece isn't a "good thing."


I started a new project tonight; a messenger bag. I'm using black duck canvas. I haven't gotten very far as I have been distracted by the Olympics and then American Idol. I have cut my pieces and completed the flap, which I appliqued (see photo). I plan on trying to make the strap adjustable by using a technique I saw on Sewing with Nancy. For the record, Nancy is one of my heroes. I hope to complete the bag tomorrow. Until then, goodnight.


Angela