Wednesday, November 30, 2011

Handmade Gift Exchange


In my last post, I told you a little about the Craftaholics Handmade Gift Exchange.  Today, I am super excited because I get to show you the gifts I made for my partner, Meaghan!  But first, let me say, "thanks" to Linda of Craftaholics Anonymous for hosting this exchange.  Through her, and the gift exchange, I "met" Meaghan!  We've been corresponding for the past several weeks and I feel I've made a true friend!  The photo at the top of this post is of the journal cover I made for Meaghan.  I used TAP (Transfer Artist Paper) to transfer the vintage lady image.  I embellished the image with small beads.  I tea dyed the doily and attached it using a vintage button.  By the way, I sewed the journal cover to fit a standard sized composition notebook.  If interested, leave a comment or send me an email and I will detail the specific dimensions and sewing directions.


Besides the journal cover I sewed.  I tried my hand at a little jewelry making.  You might remember I tried making a dictionary necklace charm a few weeks ago using Dimensional Magic Mod Podge.  That project didn't exactly turn out, but for Meaghan's charm, I used better quality paper and a different kind of bezel.  I also added a few bits of bling!  This time, success!


Again, I'm so happy I participated in this gift exchange.  It's been wonderful getting to know Meaghan, who lives in one of my most favorite places, North Carolina!  I'm so pleased that she likes the gifts I made for her and I am excited to see what she has made for me!  My package is on its way to my neck of the woods.  I will post about it when it arrives.  In the meantime,  please jump over to Craftaholics Anonymous and have a look at all the fabulous handmade gifts made and exchanged all over the country!

Tootles!  
Blog Signature

Tuesday, November 22, 2011

Transfer Artist Paper (TAP) Project


Where to begin?  I've gone nearly another week between posts!  I'm afraid I've been a slacker blogger of late.  I'm sorry.  I promise to get my blogging act together!  So what have I been doing this past week?  Well, besides the torture, I mean, physical therapy, I organized a birthday party for my now seven year old daughter!  The party was a success...even the cheetah print cakes!  I also got a bit of sewing done.   I  completed a couple of projects for my Craftaholics Anonymous Handmade Gift Exchange partner.  Unfortunately, I can't show you what I made for her just yet, but I can show you a few other sewing gifts I've made this past week.  Be sure to check out all the handmade gifts exchanged at Craftaholics Anonymous in the coming weeks!  My partner should be receiving her gifts soon!  I hope she loves them!  I can't wait to see what she has made for me, too!

A Fairy Journal Cover

Spaceship Ear Bud Case

Spaceship Ear Bud Case (back view)

I made the Fairy Journal cover for my friend, Molly.  (I hope she isn't reading this post!)  I used TAP (Transfer Artist Paper) to transfer the fairy image.  I must say, I was pretty impressed with TAP.  The image transferred to the canvas fabric perfectly!  I embellished the image using beads and embroidery.  I made the ear bud case for her little boy, Tucker.  I found the pattern and tutorial for the case at Dog Under My Desk blog via Craft Gossip.  I think it turned out cute and it was really easy, and quick, to sew.  These are great for using up fabric scraps and would make great stocking stuffers, too!

For all you readers in the United States, have a terrific Thanksgiving.  Enjoy your day of turkey, sweet potatoes, cranberry sauce, and of course pumpkin pie!  I made a "practice" pie a few days ago...

Yummy!

I also made a fantastic meal of chicken and dumplings this week.  The recipe would also be great for your leftover turkey.  


I leave you with my mom's recipe for awesome dumplings:

4 eggs
1/2 cup milk
pinch salt
flour until stiff
Drop in boiling soup and cook for about 15 minutes

Happy Thanksgiving!
Blog Signature

Thursday, November 10, 2011

Ups and Downs

Geisha Girl Cosmetic Bag (Flat Bottomed)
Surfer Girls Cosmetic Bag (Flat Bottomed)
Wow!  It's been awhile!  I've been MIA for over a week.  I cannot say the reason for my absence is that I've been busy creating, sewing, baking, or doing anything fun.  In fact, the only thing I've been busy doing is physical therapy.  Having this new knee is a lot of work!  "They" said I'd have ups and downs in my recovery.  The last couple of weeks have been full of "downs."  I've been going to torture therapy sessions three times a week, which actually does help, but geesh, I'm ready to be back to normal!

When not at therapy (or napping), I have been working on a few projects, mostly presents for upcoming birthdays and Christmas.  I made the two image transfer cosmetic bags above and added them to my Etsy Shop last week.  I've completed half of a poncho I've been knitting for my daughter.  Her birthday is in a couple of weeks.  I've also done a little more freezer paper stenciling.


This time, I used sparkle acrylic paint mixed with textile medium to create fabric paint.  I've never tried this technique before.  I think it worked pretty well, although the fabric is a little stiffer than had I used regular fabric paint.  This t-shirt is for my step-daughter, Samantha.  She is involved with a dance troupe at her college.  I hope she likes it!


A few nights ago I read a jewelry tutorial at Marla Plain and Small.  Marla's tutorial describes how to make jewelry charms using Dimensional Magic Mod Podge.  I tried the technique using a silver necklace bail and paper I cut from a thesaurus.


The Dimensional Magic is actually some pretty cool stuff.  It really does add dimension and the charm would have been really cool had I not used such a thin piece of paper.  I think the poor quality of paper is the reason why the words on the reverse side can be seen.  I will definitely try this again, but I will use higher quality paper, maybe even laminated?  If any of you have used this product, let me know.  I'd love some pointers!
  
Tootles!
Blog Signature  

Tuesday, November 1, 2011

Still Wild: Fusing Plastic!


In my last post, I managed to "build stitched layers" successfully!  So, next up to try out of the Sew Wild book is Fusing Plastic! Author Alisa Burke writes that "plastic bags are easy to transform with heat."  "When fused together, they create a versatile and strong surface that you can paint, alter, and use in mixed-media and sewing projects."  Burke goes on to say that she likes to use Target bags for her plastic fusing projects.  Unfortunately for me, I could only find one of these bags in my house.  What can I say?  I'm more a Walmart shopper.  I have a million Walmart bags, but these bags are mostly all white (and boring), so I decided to use a few plastic sacks from my daughter's favorite store, Justice.


The instructions for this technique begin on page 68.  There are basically 6 steps in this process.  First, collect your plastic sacks and cut the bottoms and the handles off.  Next, stack the bags on top of a scrap piece of fabric.  Smooth out any wrinkles and then place another piece of scrap fabric on top.  With your iron on low, "press slowly back and forth across the surface."  Once the pieces are fused together, remove the scrap fabric pieces and your fused plastic is "ready to stitch or paint."

So, was it really this easy?  Yes, for the most part.  However, I think because the Justice bag plastic is heavier or thicker than that of Target or Walmart bags, the low setting on my iron didn't cut it.  I had to crank it up a bit and press relatively hard to achieve fusion.  Using a zigzag stitch and hot pink thread, I made a quick wallet using my fused plastic.


I didn't plan it, but I like how the words, "be positive" and "share your light" ended up on the inside of the wallet.  Pretty cool huh?

Okay, another Sew Wild project completed!  What's next?  How about glue resist?!  Sounds fun!

Tootles!
Blog Signature


Tuesday, October 25, 2011

Sewing Wild


Sew Wild by Alisa Burke


I've gone wild!  Well, maybe unrestrained might be a better word to describe my stitching style for the past couple of days.  A few weeks ago, I bought Alisa Burke's Sew Wild.  This book is about Burke's style, her process and "messy approach to sewing."    Throughout the first part of the book, Burke describes different surface design techniques including using paints and inks, dyes, glue and bleach.  Burke discusses different stitching tools and is a big advocate of using the darning needle, or free motion foot, on your sewing machine.  She also explores color theory and pattern.  There is also a section in the book about finding inspiration for your design.  Burke uses a variety of techniques to create several different projects, including a hat, bag, scarf, and a quilt.  Burke encourages us to Go Wild!

I decided to release my inner wild woman and create a panel of stitched layers.  This lesson begins on page 82.  Basically sew bits and pieces of fabric, in layers, on top of a background fabric.  Burke uses her own fabrics, those she has created using paints, dyes, etc.  Since I haven't created my own fabrics, I used scraps left over from my Mug Rug.  I started with about a 12" X 12" piece of muslin, backed with batting,  and then began laying out my scraps in a rough layout.


I stitched the scraps down using straight and zig zag stitches.  Next, I took smaller scraps and placed them on top, in between to fill in the spaces.  I sewed these pieces with varying stitches as well.  I got a little messy wild here.


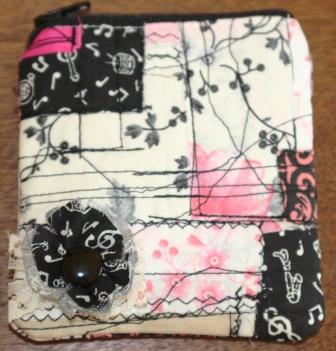
Before I was finished, I sewed even more black lines all over the piece!  I decided to make a little bag, so I cut a square from the piece and whipped up a 4" X 4" Shabby Chic Scrap Coin Purse.  I added a little frayed edged fabric flower.  I've added this little purse to my Etsy Shop!


Although I'm pleased with my results, I must say it wasn't that easy for me to get Wild and Messy!  Don't get me wrong, I've been known to "wing" some sewing instructions and measurements, but purposely being messy is hard!  It was difficult to "let go," but it was fun.  I really like this book and will definitely try more techniques, including stenciling, masking, and monotype printing!  So, look for more posts about the projects in Sew Wild.  First up:  Fusing Plastic!  Doesn't that sound fun?!  I'm off to round up Target bags!

Tootles!
Blog Signature

P.S.  Thanks for the positive feedback regarding the Sew Loquacious Handmade Holiday.  Remember, you can add any handmade holiday post by completing the link information on the Handmade Holiday page!

Sunday, October 23, 2011

A Sew Loquacious Handmade Holiday


Halloween is in one week.  There are 33 days until Thanksgiving!  There are 62 days until Christmas and 69 days until New Year's!  What are you planning for the Holidays this year?  I recently posted about my pledge to contribute to handmade charity this season as well as my plan to either make or give handmade gifts this holiday season.  With this handmade pledge in mind, I've decided to document my Handmade Holiday here on my blog.

The The Sew Loquacious Handmade Holiday will include sewn, knit, or otherwise handcrafted gifts, as well as food ideas.  What are the most memorable gifts you received or gave?  I am certain that most were handmade.  I remember my grandmother giving all her grandchildren crocheted slippers one year.  I wore mine until they had holes in the soles!  When I was in my 20's,  my mother made pajamas for everyone.  I still have the pair she made for me!  Holiday baking always evokes memories of my childhood.  My mother made divinity every year.  Truth be told, I hate divinity, but she also made fudge, almond bark covered pretzels and Party Mix.

Grab the Sew Loquacious Handmade Holiday button if you'd like to join in!  Whenever I post a Handmade Holiday project, I'll add it to the linky tool at the bottom of the Sew Loquacious Handmade Holiday page..  If you write a post about a holiday project you are made, you can link up on this page as well!  Be sure to leave a comment, too!

I'm excited to get started!  I'm on the hunt for an easy knit slipper pattern or tutorial.  I'd like to make a pair for my youngest daughter.  If you know of an easy (not using double pointed needles), let me know!

Thanks again for sending me "get well soon" wishes!  I've been feeling much better in the last few days and have completed a couple of knitting projects, which I've added to my Etsy shop.


I've also managed to get into my sewing room to work on two birthday gifts.  I tried my hand at freezer paper stencils.


I bought two ready made shirts and cut about 2 inches off the bottom.  I then sewed fabric/ruffles to them after painting the stencils.  I'm really pleased with how they both turned out.  I made a yo yo for the top shirt.  It is attached with a button pin so it can be removed for easier washing.  I had a lot of fun doing the stencils and I am still amazed how well the freezer paper works!

Have a great Sunday everyone!  Please have a look through the Charitable Links page and consider making a project for charity.  Also, please join in the Sew Loquacious Handmade Holiday!  I know it's going to be a lot of fun!

Tootles!
Blog Signature

Friday, October 21, 2011

Flea Market Friday...Tuesday

I haven't written a Flea Market Friday post in ages.  Actually, since January!  It was shortly after this last post that my work scheduled changed and I was no longer off on Fridays.  No longer was I able to visit flea markets, antique malls, garage sales and estate sales...on Fridays, anyway.  Well, guess what?  It's Friday and today I am posting about some of the great finds I came across at a local antique mall I visited.  Okay, I visited the mall on Tuesday, not Friday.  (Since I am off work recovering from my knee surgery, Tuesday could be Friday, Thursdays can be Saturdays!  Who cares!)  It was a short visit, as it's still difficult for me to get around.  I've "graduated" to a cane, but it's still difficult to "walk" around and my knee is still quite sore.  Anyway, I came across a lot of "stuff" in the mall. Here is a small sample:

1950s Needlework (LOVE IT)

Vintage Washing Machine (What? Barbaric!)

1950s Bed Jacket (COOL!)

Vintage Tied Quilt (Hexies..right?)

Vintage Tea Pot
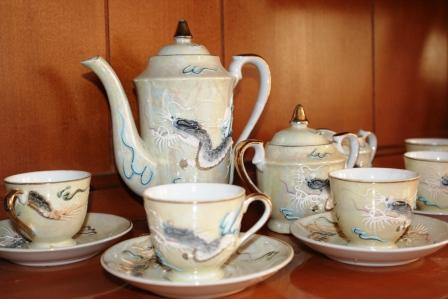
 In previous Flea Market Friday excursions, I usually focused on one style, element, or item.  For example, during one trip, I focused on handbags.  Although I didn't lean toward one thing during today's trip, I seemed to be partial to tea pots.  I even bought a tea set.  I'm not sure how "vintage" it is, but I think the set is pretty neat.  It is a set of 6 cups and saucers, cream and sugar dishes, and the tea pot.  It is designed with a dragon motif, which is textural.  The pieces are stamped "Japan" on the bottoms.


So why did I visit the antique mall on Tuesday?  It was my anniversary!  My husband, who is off work to "take care of me," and I went to lunch and then stopped at the antique mall.  I can't believe it's been another year.  I posted about our seven year anniversary last year!  Here's to 8!  Time really does fly!


Be sure to check out the Charitable Links Page.  I've added a few more links to charities collecting hand made items for their causes, including a link to a charity in New Zealand. that is collecting hand knit penguin jumpers!

Tootles!
Blog Signature