Showing posts with label fabric flowers. Show all posts

Tuesday, October 25, 2011

Sewing Wild


Sew Wild by Alisa Burke


I've gone wild!  Well, maybe unrestrained might be a better word to describe my stitching style for the past couple of days.  A few weeks ago, I bought Alisa Burke's Sew Wild.  This book is about Burke's style, her process and "messy approach to sewing."    Throughout the first part of the book, Burke describes different surface design techniques including using paints and inks, dyes, glue and bleach.  Burke discusses different stitching tools and is a big advocate of using the darning needle, or free motion foot, on your sewing machine.  She also explores color theory and pattern.  There is also a section in the book about finding inspiration for your design.  Burke uses a variety of techniques to create several different projects, including a hat, bag, scarf, and a quilt.  Burke encourages us to Go Wild!

I decided to release my inner wild woman and create a panel of stitched layers.  This lesson begins on page 82.  Basically sew bits and pieces of fabric, in layers, on top of a background fabric.  Burke uses her own fabrics, those she has created using paints, dyes, etc.  Since I haven't created my own fabrics, I used scraps left over from my Mug Rug.  I started with about a 12" X 12" piece of muslin, backed with batting,  and then began laying out my scraps in a rough layout.


I stitched the scraps down using straight and zig zag stitches.  Next, I took smaller scraps and placed them on top, in between to fill in the spaces.  I sewed these pieces with varying stitches as well.  I got a little messy wild here.


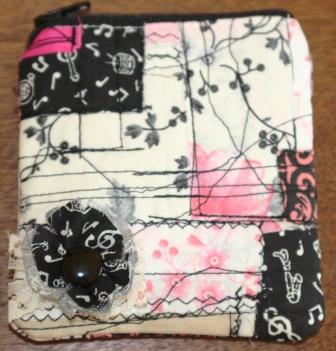
Before I was finished, I sewed even more black lines all over the piece!  I decided to make a little bag, so I cut a square from the piece and whipped up a 4" X 4" Shabby Chic Scrap Coin Purse.  I added a little frayed edged fabric flower.  I've added this little purse to my Etsy Shop!


Although I'm pleased with my results, I must say it wasn't that easy for me to get Wild and Messy!  Don't get me wrong, I've been known to "wing" some sewing instructions and measurements, but purposely being messy is hard!  It was difficult to "let go," but it was fun.  I really like this book and will definitely try more techniques, including stenciling, masking, and monotype printing!  So, look for more posts about the projects in Sew Wild.  First up:  Fusing Plastic!  Doesn't that sound fun?!  I'm off to round up Target bags!

Tootles!
Blog Signature

P.S.  Thanks for the positive feedback regarding the Sew Loquacious Handmade Holiday.  Remember, you can add any handmade holiday post by completing the link information on the Handmade Holiday page!

Saturday, February 26, 2011

Journal Jackets...A Tutorial

Happy Saturday!  Today I'm posting the Journal Jacket Tutorial I wrote several weeks ago for Tutorial Tuesday at Vintage Dragonfly.  I've decided to post it here in case you missed it over at Joanne's!  Enjoy!


I call them, "Journal Jackets."  They are actually book covers, or jackets.  You can use them to cover one of the Twilight books you are reading in order to avoid the weird looks by coworkers in the break room.  Or, you can actually cover that journal you bought for $3.00 because it has a picture of a too cute cuddly kitten on the front.  Whatever you decide to cover, here is my quick tutorial for making your very own "Journal Jacket."

Necessities
Outside fabric (the main cover); I used a decorator weight patterned piece.
Rectangular fabric scrap for "title."  I used an off-white silk-like fabric because it seems to distort the stamps/fabric ink the least.  NOTE:  The fabric really isn't silk, but I'm not sure what it is exactly.  I will refer to it as "silk" throughout the tutorial.
Fabric scraps for the image transfers.
Sewing machine and coordinating thread
Gel medium and other image transfer supplies, including images
A book or journal to cover

Measurements
First, you'll have to do some measuring.  Just between you and me, I suck at taking measurements. Yes, it's true, even though my first love is sewing, I am TERRIBLE with my ruler!  So, I tend to eyeball things a lot.  For your journal jacket, however, just set your open book on a piece of paper and draw around it with a pencil.  Now, you'll just need to add enough to each side to make the inside flaps, which hold the fabric onto the book.  You'll also have to add enough to the length (and width) for the seam allowance.  I use about a half an inch all around for the seam allowance.  I added about 3 inches (total, including for the seam allowance) for each inside flap and about 1 inch at the top and bottom.  Remember, you want to be able to get your journal inside the cover, but you also want the cover snug enough to hold the book.
NOTE:  If the book you are covering has a paper jacket, use it to begin your measurements..just add a couple inches to the width  for the flaps and seam allowances.  Don't forget to add an inch or so for the length, too.


I usually give myself a little more wiggle room.
 Image Transfers 
Now that I have a pretty good idea the total size of the jacket, I can "close" it and figure out how much space I will have to embellish the front cover.  For this particular jacket, I decided to use three of my favorite vintage photos.  I gathered my image transfer stuff and got busy.


I'm still a beginner at this image transfer process so I've been experimenting with different methods.  I've found the most success using transparencies.  For this project, I printed the three images onto one full sheet of clear mailing labels.  Sidenote:  transparencies are expensive.  I've tried to get as many images onto one sheet as possible in order to not waste an entire sheet for one photo.

Okay, back to the tutorial.  Using a sponge brush, place a thin layer of gel medium to the spot where you want your image to transfer to.  Now cut out your image, place it face down on top of the gel medium you just applied and burnish it using a brayer or spoon.  Remove the transparency and your image should now be on your fabric.


Allow the transfers to dry completely.  Next, I decided to jazz up the images by hand coloring or enhancing them with fabric markers and pastels.  Adding color to the black and white images reminds me of vintage photos that have been hand colored.  I really love the look!


If you don't want to color the images, don't!  There really aren't any rules here!  If you do add color, be sure to set the colors with your iron.  A good idea is to place a piece of tissue paper on top of the image while ironing and don't slide the iron around as this can smudge the ink.  Once the images are dry, distress with distressing ink if desired.  I desired, so I did.

Placement
Separate each image by cutting them out of the fabric.  Place each image onto your silk front cover rectangle.  Determine the best placement.


Note that the silk rectangle is resting on top of the outside fabric.  I frequently check on placement and size before actually sewing things together.  I know, maybe if I measured better, I wouldn't have to do this so often.  Once you are happy with placement, sew each image to the rectangle.


Embellishments
Now it's time to embellish your silk-like rectangle even more.  I kept it fairly simple and decided to adhere a fabric flower and button to the top and then stamped "My Story My Life" with alphabet stamps.


I used a scrap of the outside fabric to make the flower and then just sewed a button into the middle of it.  Next, just sew the button onto the rectangle.  Easy peasy.

Secure Rectangle, Sew Hems and Finish 
Now, secure your rectangle to the outside cover fabric.  Using your book as a guide, double and triple check your placement before sewing.


Now measure (or eyeball) again, iron and then sew a double hem on the top and bottom of the outside fabric.


Now for the moment of truth...sew your double hem on the inside flap and then sew the flaps down.  These are the "pockets" that hold the book cover and back.

Voila!  Your own super cute...and personalized...Journal Jacket!

I hope you liked this tutorial.  If you have any questions..or I failed to be clear on something, please do not hesitate to email me!  If you decide to sew one of your own, please let me know!  I'd love to see them!

Thanks so much to JoAnne at Vintage Dragonfly for asking me to write a tutorial for her Tutorial Tuesday! I am very humbled to be a part of her lovely blog and am forever grateful for her invitation.

Toodles!

Angela


Sunday, January 2, 2011

A Few New Year Projects

Happy 2011! I sure hope you all have had a super weekend and enjoyed this Holiday Season. I wish you all a year full of happiness, joy, creativity and love.

Here are a few projects that I've been working on in these last few days of 2010:


I made this pillow cover in the same manner as the one I made for my mother-in-law. I think it turned out pretty cute. Plus, I think the photo of my other mother, Anita, is great.


For this card wallet, I used the Valori Wells pattern I won from the Hot Potato. I used my fabric markers, crayons, and stamps to create, "Mavis," a character "created" by my cousin and me! That's Rich, Stefanie!

Please remember to add your thumbnail here for showcase your January Dress.  I will keep this link up for the entire month.  I've already been able to view some super designs.  Please check out the dresses and meet the artists behind them.

Toodles for now!

Angela


Monday, December 20, 2010

Hot Potato Winner!


The Hot Potato Valori Wells Wallet Pattern Winner is...insert another drum roll here...

Sammy from The English Country Garden in Bags!  Congratulations!  I know you'll love the pattern and I can't wait to see your creations!

Speaking of creations.  Have a look at this pillow I made this past weekend.  The photo is of my mother-in-law when she was a little girl.  Doesn't she look sassy?  I hope she likes her gift.


I really had a lot of fun making this gift.  I made the fabric flowers in the corner, which were actually the most difficult part of this project.  What do you think?

I hope everyone has a great week.  Congratulations again to Sammy!

Toodles,

Angela

Friday, December 10, 2010

7 Swans and Christmas Crafting

7 Swans A Swimming ATC
Karla Jackson


I wish my photo of Karla's ATC would have turned out better.  This card is absolutely gorgeous.  The swan's body appears to be a white shimmery leaf.  The head and neck are made out of beautiful beads.  The paper that the swan is actually sitting upon is so pretty.  This is definitely one of my favorite ATCs ever.  Thanks Karla.  I love it!

I'm sure all of you are super busy with shopping, baking, and, I hope, making!  Here are a couple of presents I've been working on. 

Bag Front (note the super cool Yo-Yo)

Bag Back
I've made this little zippy bag for one of my girls.  I drew the bulldog (my interpretation of the college mascot)and then colored the collar and added some bling.  Who said bulldogs can't bling it out?  I also incorporated my second ever YoYo as an embellishment, as well as some ribbon.  I then used my new alphabet stamps for the words.  I'm really loving the stamps!

Thom York Bracelet and Earrings
From "Eraser" CD

Here I entered brand new territory!  I've never made jewelry before and I swear I will not allow myself to get too involved in this craft as I surely don't have the time or money to get too crazy with this!  That said, these earrings and bracelet were really fun to make...except attaching the jump rings!  I am sure there is a tool to make this easier right?  Anyway, to make the earrings, I cut out the rectangle shapes from a paper CD case.  I glued each piece to some heavy cardboard and then "painted" them with several coats of ModPodge.  I did the same with the bracelet, but I had shape the cardboard, which was a bit tricky.  I think they turned out pretty cool and what makes them even neater is that they are totally unique.  I'm quite sure there aren't Thom York earrings out there...I hope.  My daughter is Radiohead's biggest fan, so I'm sure she'll love them!

I can't wait to see what you're working on!
Toodles for now!

Angela
 

Saturday, December 4, 2010

12 Days of Christmas, Treasure Barn ATC, a Yo Yo, and A Wallet


It is indeed Christmas at my house.  I received the 12 Days of Christmas ATCs from Wendy!  If you remember, I signed up a few months ago to participate in this ATC Swap and my assignment was to create 12 "A Patridge in a Pear Tree" ATCs.  I made my cards and sent them to Wendy as did the other 11 artists.  (I love saying, artists)  Wendy sort of made an accordian-like book out of the cards and packaged them in a beautiful box.  I've decided to celebrate how awesome these cards are by showing one each day.  I know, I know, the 12 Days of Christmas don't actually begin until Christmas Day, but I cannot wait!  So, let's go!

2 Turtledoves by Blanche

3 French Hens by Debbie


4 Calling Birds by Francie
You can see mine here.  I'll post 5 thru 12 in the coming days!  They are all awesome!  Come back and see!

As promised, here is the ATC I sent DeeDee for November's Treasure Barn Swap:


I combined a sort of Thanksgiving theme along with a personal touch with the little Sioux girl as DeeDee grew up in Sioux City, Iowa!  I hope she liked it!

Two more things to show you this Saturday night.  First, behold, my very first yo-yo! 


A big shout out goes to Bonnie for this flower.  I've actually wanted to make yo-yos forever, but didn't realize just how easy they are until I watched Bonnie's video!  Thanks Bonnie!

Last, but not least, here is my first card wallet made with the Valori Wells pattern.  Remember to SIGN UP and you can win the pattern! 


I should have inserted a few cards before taking the picture so you could see the pockets a bit better, but you get the idea right? Anyway, the pattern was pretty easy to follow and this didn't take long to put together.  I used alphabet stamps and fabric ink to stamp "Yum" and I drew the frog with fabric markers.  I glued the googly eyes and sewed the tiny (extremely, annoyingly small) black beads on to represent a fly. What do you think? 

Have a fantastic weekend!

Toodles,
Angela

Monday, November 29, 2010

Meet A Great Artist, A Giveaway, and a Funky Crochet Flower

Up first today, I'd like to introduce you to a fabulous artist.  I met Liza MacKinnon at a weekend nearby art fair.  I was drawn to Ms. MacKinnon's space when I saw her handmade cards depicting vintage homemakers with "sewn-on" skirts.  I also saw some amazing wedding cards she made.

Image from MacKomics Studio


Aren't they great?!  Being Christmastime, however, I bought a Christmas card that Ms. MacKinnon said was made from a photo of her great-grandmother.  Here is the card:


This card is beautiful.  I just love it.  I'm not sure I will be able to actually give out this card...I may just have to keep it for myself!  You can find more of Liza MacKinnon's work on her website as well as her on her Facebook (MacKomics Studio) page.  By the way, don't you think she would do fantastic with the Alice & Camilla Paper Dresses?? 

Next, I want to tell you about my friend at RubyMarilyn.  She's having her very first giveaway.  She's made some awesome ornaments and if you win, she'll make you a custom ornament in the shape of whatever state you'd like.  Check it...and while you are there, have a look at the hand crocheted necklaces she makes for her Etsy shop.  They are gorgeous.

Image taken from RubyMarilyn
Speaking of crochet, have a look at my very first crochet flower:


Okay, I know, it doesn't look much like a flower, but it's my first real attempt at crocheting, so I'm happy.  I'm sure I'll get the hang of it, I hope.  I'm taking another of Bonnie's classes.  This one is called, A Pocket Full of Posies.  In this class, I am going to learn how to make the crochet flowers, as well as felt flowers, yo-yos, organza and tulle flowers, and more.  I'm really excited about learning to make all these, but mostly this crochet flower.  By the way, this is a self-paced class and is you can start at any time if you are interested.  You can sign up at Bonnie's blog or at her Etsy Shop.

A Pocket Full of Posies Class
Okay, I'm off to practice, practice, practice my crocheting!  Don't forget to sign up for a chance to win the Valori Wells wallet Hot Potato Pattern

Toodles!

Angela