
Monday, February 28, 2011
Saturday, February 26, 2011
Journal Jackets...A Tutorial
Happy Saturday! Today I'm posting the Journal Jacket Tutorial I wrote several weeks ago for Tutorial Tuesday at Vintage Dragonfly. I've decided to post it here in case you missed it over at Joanne's! Enjoy!

I call them, "Journal Jackets." They are actually book covers, or jackets. You can use them to cover one of the Twilight books you are reading in order to avoid the weird looks by coworkers in the break room. Or, you can actually cover that journal you bought for $3.00 because it has a picture of a too cute cuddly kitten on the front. Whatever you decide to cover, here is my quick tutorial for making your very own "Journal Jacket."
Necessities
Outside fabric (the main cover); I used a decorator weight patterned piece.
Rectangular fabric scrap for "title." I used an off-white silk-like fabric because it seems to distort the stamps/fabric ink the least. NOTE: The fabric really isn't silk, but I'm not sure what it is exactly. I will refer to it as "silk" throughout the tutorial.
Fabric scraps for the image transfers.
Sewing machine and coordinating thread
Gel medium and other image transfer supplies, including images
A book or journal to cover
Measurements
First, you'll have to do some measuring. Just between you and me, I suck at taking measurements. Yes, it's true, even though my first love is sewing, I am TERRIBLE with my ruler! So, I tend to eyeball things a lot. For your journal jacket, however, just set your open book on a piece of paper and draw around it with a pencil. Now, you'll just need to add enough to each side to make the inside flaps, which hold the fabric onto the book. You'll also have to add enough to the length (and width) for the seam allowance. I use about a half an inch all around for the seam allowance. I added about 3 inches (total, including for the seam allowance) for each inside flap and about 1 inch at the top and bottom. Remember, you want to be able to get your journal inside the cover, but you also want the cover snug enough to hold the book.
NOTE: If the book you are covering has a paper jacket, use it to begin your measurements..just add a couple inches to the width for the flaps and seam allowances. Don't forget to add an inch or so for the length, too.

Image Transfers
Now that I have a pretty good idea the total size of the jacket, I can "close" it and figure out how much space I will have to embellish the front cover. For this particular jacket, I decided to use three of my favorite vintage photos. I gathered my image transfer stuff and got busy.

I'm still a beginner at this image transfer process so I've been experimenting with different methods. I've found the most success using transparencies. For this project, I printed the three images onto one full sheet of clear mailing labels. Sidenote: transparencies are expensive. I've tried to get as many images onto one sheet as possible in order to not waste an entire sheet for one photo.
Okay, back to the tutorial. Using a sponge brush, place a thin layer of gel medium to the spot where you want your image to transfer to. Now cut out your image, place it face down on top of the gel medium you just applied and burnish it using a brayer or spoon. Remove the transparency and your image should now be on your fabric.


Allow the transfers to dry completely. Next, I decided to jazz up the images by hand coloring or enhancing them with fabric markers and pastels. Adding color to the black and white images reminds me of vintage photos that have been hand colored. I really love the look!

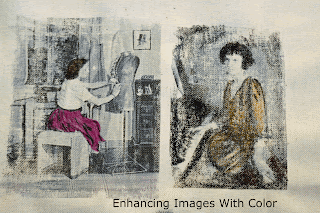
If you don't want to color the images, don't! There really aren't any rules here! If you do add color, be sure to set the colors with your iron. A good idea is to place a piece of tissue paper on top of the image while ironing and don't slide the iron around as this can smudge the ink. Once the images are dry, distress with distressing ink if desired. I desired, so I did.
Placement
Separate each image by cutting them out of the fabric. Place each image onto your silk front cover rectangle. Determine the best placement.

Note that the silk rectangle is resting on top of the outside fabric. I frequently check on placement and size before actually sewing things together. I know, maybe if I measured better, I wouldn't have to do this so often. Once you are happy with placement, sew each image to the rectangle.

Embellishments
Now it's time to embellish your silk-like rectangle even more. I kept it fairly simple and decided to adhere a fabric flower and button to the top and then stamped "My Story My Life" with alphabet stamps.


I used a scrap of the outside fabric to make the flower and then just sewed a button into the middle of it. Next, just sew the button onto the rectangle. Easy peasy.
Secure Rectangle, Sew Hems and Finish
Now, secure your rectangle to the outside cover fabric. Using your book as a guide, double and triple check your placement before sewing.


Now measure (or eyeball) again, iron and then sew a double hem on the top and bottom of the outside fabric.


Necessities
Outside fabric (the main cover); I used a decorator weight patterned piece.
Rectangular fabric scrap for "title." I used an off-white silk-like fabric because it seems to distort the stamps/fabric ink the least. NOTE: The fabric really isn't silk, but I'm not sure what it is exactly. I will refer to it as "silk" throughout the tutorial.
Fabric scraps for the image transfers.
Sewing machine and coordinating thread
Gel medium and other image transfer supplies, including images
A book or journal to cover
Measurements
First, you'll have to do some measuring. Just between you and me, I suck at taking measurements. Yes, it's true, even though my first love is sewing, I am TERRIBLE with my ruler! So, I tend to eyeball things a lot. For your journal jacket, however, just set your open book on a piece of paper and draw around it with a pencil. Now, you'll just need to add enough to each side to make the inside flaps, which hold the fabric onto the book. You'll also have to add enough to the length (and width) for the seam allowance. I use about a half an inch all around for the seam allowance. I added about 3 inches (total, including for the seam allowance) for each inside flap and about 1 inch at the top and bottom. Remember, you want to be able to get your journal inside the cover, but you also want the cover snug enough to hold the book.
NOTE: If the book you are covering has a paper jacket, use it to begin your measurements..just add a couple inches to the width for the flaps and seam allowances. Don't forget to add an inch or so for the length, too.

 |
| I usually give myself a little more wiggle room. |
Now that I have a pretty good idea the total size of the jacket, I can "close" it and figure out how much space I will have to embellish the front cover. For this particular jacket, I decided to use three of my favorite vintage photos. I gathered my image transfer stuff and got busy.

I'm still a beginner at this image transfer process so I've been experimenting with different methods. I've found the most success using transparencies. For this project, I printed the three images onto one full sheet of clear mailing labels. Sidenote: transparencies are expensive. I've tried to get as many images onto one sheet as possible in order to not waste an entire sheet for one photo.
Okay, back to the tutorial. Using a sponge brush, place a thin layer of gel medium to the spot where you want your image to transfer to. Now cut out your image, place it face down on top of the gel medium you just applied and burnish it using a brayer or spoon. Remove the transparency and your image should now be on your fabric.


Allow the transfers to dry completely. Next, I decided to jazz up the images by hand coloring or enhancing them with fabric markers and pastels. Adding color to the black and white images reminds me of vintage photos that have been hand colored. I really love the look!


If you don't want to color the images, don't! There really aren't any rules here! If you do add color, be sure to set the colors with your iron. A good idea is to place a piece of tissue paper on top of the image while ironing and don't slide the iron around as this can smudge the ink. Once the images are dry, distress with distressing ink if desired. I desired, so I did.
Placement
Separate each image by cutting them out of the fabric. Place each image onto your silk front cover rectangle. Determine the best placement.

Note that the silk rectangle is resting on top of the outside fabric. I frequently check on placement and size before actually sewing things together. I know, maybe if I measured better, I wouldn't have to do this so often. Once you are happy with placement, sew each image to the rectangle.

Embellishments
Now it's time to embellish your silk-like rectangle even more. I kept it fairly simple and decided to adhere a fabric flower and button to the top and then stamped "My Story My Life" with alphabet stamps.


I used a scrap of the outside fabric to make the flower and then just sewed a button into the middle of it. Next, just sew the button onto the rectangle. Easy peasy.
Secure Rectangle, Sew Hems and Finish
Now, secure your rectangle to the outside cover fabric. Using your book as a guide, double and triple check your placement before sewing.


Now measure (or eyeball) again, iron and then sew a double hem on the top and bottom of the outside fabric.


Now for the moment of truth...sew your double hem on the inside flap and then sew the flaps down. These are the "pockets" that hold the book cover and back.
Voila! Your own super cute...and personalized...Journal Jacket!
I hope you liked this tutorial. If you have any questions..or I failed to be clear on something, please do not hesitate to email me! If you decide to sew one of your own, please let me know! I'd love to see them!
Thanks so much to JoAnne at Vintage Dragonfly for asking me to write a tutorial for her Tutorial Tuesday! I am very humbled to be a part of her lovely blog and am forever grateful for her invitation.
Toodles!
Angela
Monday, February 21, 2011
February Blissful ATC Swap: LOVE

The February ATCs are being posted by the Blissful ATC Swappers. The above is the ATC I received from my swap partner, Marilyn. Isn't is gorgeous! I love the little crochet heart! Obviously, "Love" is this month's theme. And I love this card! Marilyn's blog is beautiful, just like her ATC. It's called Busy Martha..and she is busy!
Here is sneak peak at the card I sent Marilyn. I'm not sure if she has received it yet. You can also see more ATCs at the Blissful ATC Flickr Page.

I based my ATC on the painting, Love, by Gustav Klimt. Speaking of Klimt, there are still February dresses being linked up HERE. Liza just linked up her fabulous dress, which she BEADED! It's awesome. Please check out all the dresses. Reminder: March's artist inspiration is Pop Art!
Toodles!
Angela
Sunday, February 20, 2011
March On to POP ART: Dress Up 2011
 |
| Richard Hamilton. Just What Is It That Makes Today's Home So Different, So Appealing? 1956 Collage |
Drum roll, please......POP Art! Yes, the theme for March's Dress Up is Pop Art! Think Andy Warhol, Jasper Johns, Roy Lichtenstein! Imagine soup cans and Marilyn Monroe!
 |
| Andy Warhol. Marilyn Monroe 1962 |
 |
| Jasper Johns. Flag 1954-55 |
 |
| Roy Lichtenstein. Drowning Girl 1963 |
The Hamilton collage at the top of this post is considered to be the first work that can be called an "unequivocal statement of pop art." In other words, this piece pretty much started the movement. The Pop Art Movement can be summed up simply: Bring art back into the daily lives of people. It viewed commercial culture as its raw material, an endless source of pictorial subject matter. Pop Art was an expression of the optimistic spirit of the 1960s that began with the election of John F. Kennedy and ended at the height of the Vietnam War. You can find a lot more information related to this movement HERE and HERE. You'll also find more examples of the artists' works.
I know you will enjoy this theme! Let your imaginations run wild! The Simply Linked link will be up and running with the March 1st post! I can't wait to see the dresses!
There is still a little over a week left in February. That means you can still post your Klimt inspired February dress HERE! If you aren't participating in the Dress Up, that's okay. You can still click over and have a look at the dresses. The dresses inspired by Klimt are fabulous!
Thursday, February 17, 2011
A Beautiful Mug Mat From Canada

Look at this beautiful Mug Mat! Margaret, from her blog, The French Bear, sent me this wonderful mat all the way from Canada. Isn't it gorgeous?! The colors are beautiful...greens, tans, and pinks. The details are amazing. And look at the fabulously creative pocket:

Inside the pocket is a packet of tea! I adore this mat! Look at the backside of the mat. It's just as beautiful as the front!

That's not all, folks! Along with the mat, Margaret also sent a fantastic velvet heart and gorgeous post card.

Thank you thank you, Margaret! I adore everything! You were right, Donna, making these quilted mug mats is addictive! The swappers' mats that are posted on Donna's Flickr page are so great. I can't wait to see more as more of them make it to their partners. I sure hope Margaret likes the mat I made!
Toodles for now!
Angela
Sunday, February 13, 2011
Blogiversary or Blog Birthday? It's MINE!

Is is Blogiversary or BlogBirthday? Whichever, it's MINE! Actually, my one year blog birthday or blog anniversary was Saturday.. Can you believe it?! It's been a wild and crazy year. I've learned so much and "met" so many fantabulous people! I know this second year will bring even more fun and new, exciting artistic endeavors await!
You might remember, my Try Harder #6 was to open my Etsy store to coincide with my anniversary date, but, alas, I'm a little behind schedule...such is a common theme in my life. So, I haven't opened my store yet, but I have been working on a bit of an inventory. What do you think:

I know there are a ton of handmade purse-type items and sellers on Etsy, but I think there is room for one more. Right? The above is actually a checkbook cover and a matching coin purse. Would you buy these? Come on, be honest. I would.
I've been working on more inventory items, to include more checkbook covers, purses, pouches, and bags. I've also been working on ATCs, the artist inspiration for March Dress Up, and my Mug Mat. I've actually finished my mat and it's on it's way to my swap partner. Once Margaret at The French Bear receives it, she will post a photo as I will when I receive her's. It was first real quilting project and I'm pretty happy with how it turned out. I can't wait to receive a mat from Margaret. Her blog is just gorgeous. You should click over and check it out!
Have a super Valentine's Day and a great week everyone! I'll talk to you soon.
Angela
Friday, February 11, 2011
February Artful Bag Challenge: Altered Bag

What do you think about "Patchwork Train Case" for the name of my first ever altered bag? I signed up for the Artful Bag Challenge over at Frosted Petunias and this month's challenge is to alter an object into a bag. In other words, take something that isn't a bag and make it a bag. So, I took a small wooden chest I found at Joann's and transformed it into a train case. Well, a train case for Barbie. (It's pretty small).

I started by cutting narrow strips of fabric and then used Mod Podge to adhere them to the box. I covered every side of the box and then painted the inside edges with black acrylic paint. I smoothed the back of a heart button and "super glued" it onto the outside of the gold latch. I used a "stem" from an old bunch of fake flowers for the handle after a gold paint touch up.


I really like how the shiny Mod Podge made the fabric strips look. I painted on several layers of the stuff and that made the fabric look shiny and a little leathery. Which, is kind of the look I was going for originally. I knew I wanted to make a train case-like purse, but struggled with how to make it appear like leather. I actually began this project using a box that one of my favorite teas came in, but I wasn't pleased with my faux leather painting job. So, I scrapped that version and began again. I decided these colors, plus the heart, was appropriate for February...Valentine's Day!
Please go over to Anna's Blog and check out the other Altered Bags. They are all so amazing. I am so impressed with how creative those ladies are!
Speaking of creative ladies, please don't forget to have a look at the February Dresses on parade. They are also super fabulous. February's artist inspiration is Gustav Klimt and the dresses are spectacular. I am working on the details regarding who or what artist inspiration we will have for March. I think everyone will love it!
Have a super weekend everyone!
Angela
Subscribe to:
Posts (Atom)